Meetup Technical Review
In the offline Shifu Meetup event held on 2022.9.29, Yang Xijie from Edgenesis demonstrated how Shifu is integrated into multiple physical IoT devices, proving through this intuitive way that Shifu framework enables fast access to devices, good isolation and easy App development without single-point failure.
Five devices were displayed in this activity, namely MQTT server, RS485 temperature and humidity meter and RS485 LED, Siemens S7 PLC, and Hikvision camera - all of which are relatively common IoT devices. Let's review the integration process below.

Create a Cluster and Install Shifu
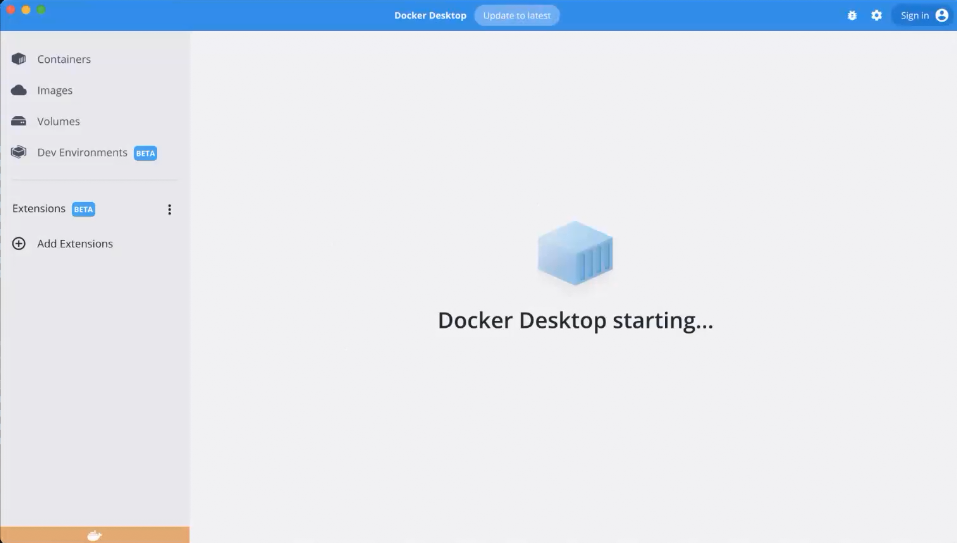
First we need to start Docker locally. Just open Docker Desktop using Windows or macOS Search and minimize it to the background.
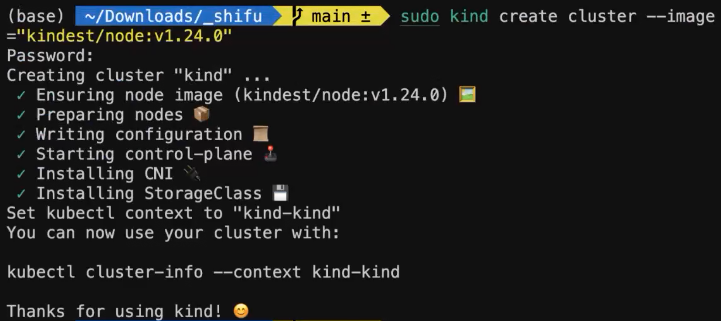
After that we need to create a k8s cluster with kind. Later on Shifu and the digital twins of IoT devices will exist in this cluster as Pod.
# Create a Cluster
$ sudo kind create cluster --image="kindest/node:v1.24.0"

# Prepare the image in advance for import into the cluster
$ sudo docker pull bitnami/kube-rbac-proxy:0.13.1
$ sudo docker pull edgehub/shifu-controller:v0.1.1
$ sudo docker pull nginx:1.21
$ sudo kind load docker-image bitnami/kube-rbac-proxy:0.13.1 edgehub/shifu-controller:v0.1.1 nginx:1.21
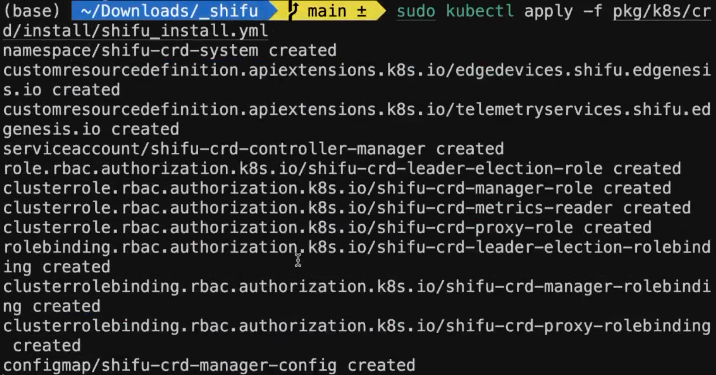
Shifu supports one-click installation, just clone Shifu repository first, and deploy it later with one single command:
# Install shifu
$ git clone https://github.com/Edgenesis/shifu.git
$ cd shifu
$ sudo kubectl apply -f pkg/k8s/crd/install/shifu_install.yml

# Run an application that will be used later
$ sudo kubectl run --image=nginx:1.21 nginx
You can also check out a more detailed tutorial on installing Shifu locally.
Device Integration
MQTT
Test MQTT Server
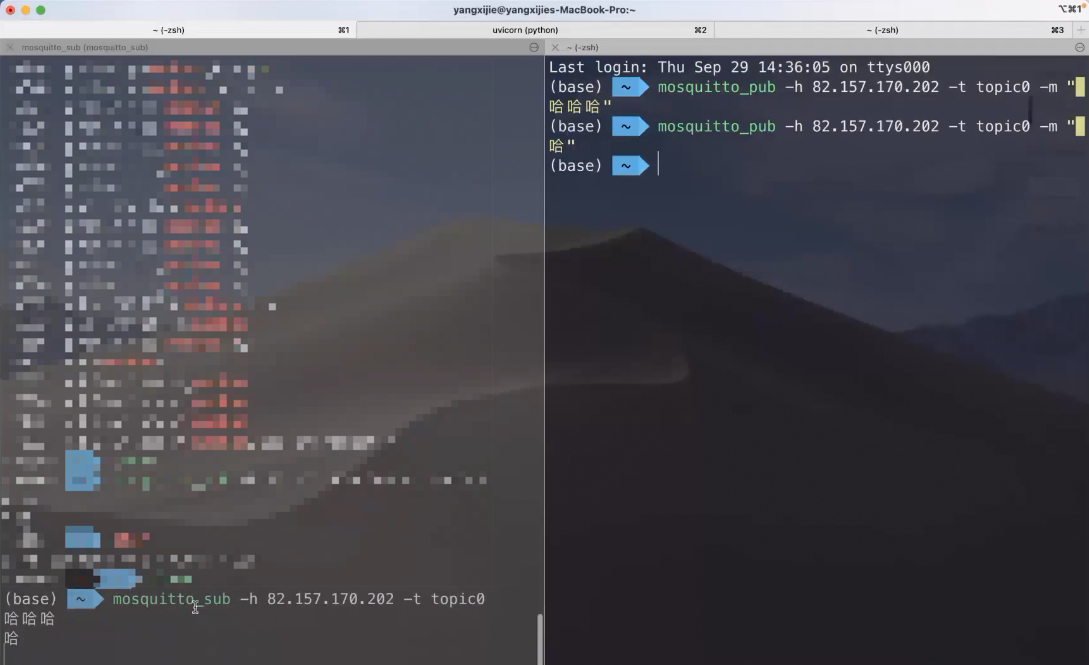
We have deployed an MQTT server and can test it by first opening two shells.
# shellA
$ mosquitto_sub -h 82.157.170.202 -t topic0

# shellB
$ mosquitto_pub -h 82.157.170.202 -t topic0 -m "lol"
You can see that the message sent can be received correctly.
Integrate the Device
Next we can modify the corresponding configuration, download the corresponding image, and then use the kubectl apply command to integrate the MQTT server into Shifu as a digital twin.
Modify spec.address to 82.157.170.202:1883 and spec.protocolSettings.MQTTSetting.MQTTTopic to topic0 in examples/my_mqtt/mqtt_deploy.
$ sudo docker pull edgehub/deviceshifu-http-mqtt:v0.1.1
$ sudo kind load docker-image edgehub/deviceshifu-http-mqtt:v0.1.1
$ sudo kubectl apply -f examples/my_mqtt/mqtt_deploy

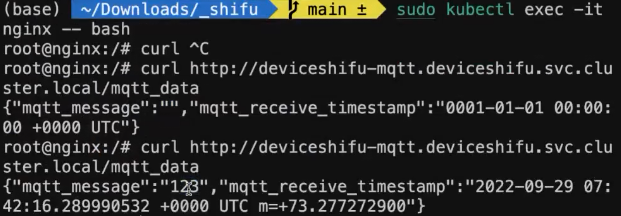
Read the Data
We can interact with the digital twin by starting an nginx application in the cluster.
$ sudo kubectl exec -it nginx -- bash

$ curl http://deviceshifu-mqtt.deviceshifu.svc.cluster.local/mqtt_data
Connect Thermometer and LED
Connect Device to Computer
- The thermometer is connected to the computer using a serial server via a network cable
- LEDs are connected to the computer using an RS485 to USB chip
Start HTTP Service Locally
Since Shifu does not support Modbus protocol right now, we need to convert the data read by Modbus to HTTP data.
$ cd api_thermometer
$ uvicorn --host 0.0.0.0 --port 23330 main:app

$ cd api_led
$ uvicorn --host 0.0.0.0 --port 23331 main:app
contents in api_thermometer
main.py
from fastapi import FastAPI
from typing import List
from pymodbus.client.sync import ModbusTcpClient

app = FastAPI()

def getHumidityAndTemperature() -> List[float]:
    """
    return temperature and humidity datas retrieved from TAS-LAN-460
    """
    client = ModbusTcpClient(host='192.168.0.80', port=10123) # the port of TAS-LAN-460
    client.connect()
    SLAVE = 0x01
    r = client.read_holding_registers(address=0x0000, count=2, unit=SLAVE)
    print("collected data", r.registers)
    client.close()

    result = [r.registers[0] / 10, r.registers[1] / 10]
    return result

@app.get("/")
def root():
    return { "message": "Hello World" }

@app.get("/temperature")
def getTemperature():
    temperature = getHumidityAndTemperature()[1]
    return { "value": f"{temperature}" }

@app.get("/humidity")
def getHumidity():
    humidity = getHumidityAndTemperature()[0]
    return { "value": f"{humidity}" }
requirements.txt
fastapi
pymodbus
contents in api_led
main.py
from fastapi import FastAPI
from pymodbus.client.sync import ModbusSerialClient
from typing import List, Dict

app = FastAPI()

class ZhongshengLed:
    """
    DEVICE_NAME = "ZhongshengLed"
    """

    def __init__(self, device_address: int = 0x01, port: str = '/dev/tty.usbserial-14120') -> None:
        self.device_address = device_address
        self.client = ModbusSerialClient(method='rtu', port=port,  stopbits=1, bytesize=8, parity='N', baudrate=9600, timeout=2.0)

    def setLedCharacter(self, position: int, character: str):
        self.setLedAscii(position=position, ascii_value=ZhongshengLed.character2ascii[character])

    def setLedAscii(self, position: int, ascii_value: int):
        self.client.connect()
        self.client.write_register(address=position, value=ascii_value, unit=self.device_address)
        self.client.close()

    def setFourLedsString(self, string: str):
        self.setFourLedsAsciis(ascii_values=[ZhongshengLed.character2ascii[string[0]], ZhongshengLed.character2ascii[string[1]], ZhongshengLed.character2ascii[string[2]], ZhongshengLed.character2ascii[string[3]]])

    def setFourLedsAsciis(self, ascii_values: List[int]):
        self.client.connect()
        self.client.write_registers(address=ZhongshengLed.LedPosition.one, values=ascii_values, unit=self.device_address)
        self.client.close()

    class LedPosition:
        one = 0
        two = 1
        three = 2
        four = 3

    character2ascii: Dict[str, int] = {
        "0": 0x30, "1": 0x31, "2": 0x32, "3": 0x33, "4": 0x34,
        "5": 0x35, "6": 0x36, "7": 0x37, "8": 0x38, "9": 0x39,
        ".": 0x2e, "-": 0x2d, " ": 0x20
    }


    def setDot(self, count: int = 1):
        self.client.connect()
        self.client.write_register(address=16, value=count, unit=self.device_address)
        self.client.close()

    def setNegative(self, isNegative: bool = False):
        self.client.connect()
        self.client.write_register(address=17, value=1 if isNegative else 0, unit=self.device_address)
        self.client.close()

    def setFloat(self, value: float):
        """
        display one decimal place
        """
        self.setDot(count=1)
        if value < 0:
            self.setNegative(True)
        else:
            self.setNegative(False)

        data = int(abs(value) * 10)

        self.client.connect()
        self.client.write_register(address=7, value=data, unit=self.device_address)

        # self.client.write_register(address=16, value=value, unit=self.device_address)
        self.client.close()

    def setBrightness(self, brightness: int = 7):
        self.client.connect()
        self.client.write_register(address=14, value=brightness, unit=self.device_address)
        self.client.close()

device = ZhongshengLed()

@app.get("/")
def root():
    return { "message": "Hello World" }

@app.get("/setfloat/{value}")
def setTemperature(value: float):
    device.setFloat(value=value)
    return { "OK": "OK" }

@app.get("/setfloat/{value}")
def setTemperature(value: float):
    device.setFloat(value=value)
    return { "OK": "OK" }

@app.get("/setfloat")
def setTemperature(value: float = 0.0):
    device.setFloat(value=value)
    return { "OK": "OK" }
requirements.txt
fastapi
pymodbus
Local Verification
$ curl http://localhost:23330/temperature
$ curl http://localhost:23330/humidity
$ curl http://localhost:23331/setfloat\?value\=123.4

Device Integration
- Modify the IP address in
http_thermometer/deployment/http_edgedevice.yaml. - Modify the IP address in
http_led/deployment/http_edgedevice.yaml。
$ sudo docker pull edgehub/deviceshifu-http-http:v0.1.1
$ sudo kind load docker-image edgehub/deviceshifu-http-http:v0.1.1
$ sudo kubectl apply -f examples/my_http_led/deployment
$ sudo kubectl apply -f examples/my_http_thermometer/deployment
Interact with Devices
Start nginx to interact with the thermohygrometer:
$ sudo kubectl exec -it nginx -- bash

$ curl http://my-thermometer.deviceshifu.svc.cluster.local/temperature
$ curl http://my-thermometer.deviceshifu.svc.cluster.local/humidity
$ curl http://my-led.deviceshifu.svc.cluster.local/setfloat?value=23.4
Application Development
Read the temperature and humidity and then display it alternately on the LED.
$ sudo docker build -t yangxijie/connection:v0.0.1 .
$ sudo docker images | grep connection
yangxijie/connection  v0.0.1  a9526147ddad  2 minutes ago  125MB
$ sudo kind load docker-image yangxijie/connection:v0.0.1
$ sudo kubectl run --image=yangxijie/connection:v0.0.1 connection-name
The illustration of this application is as follows:
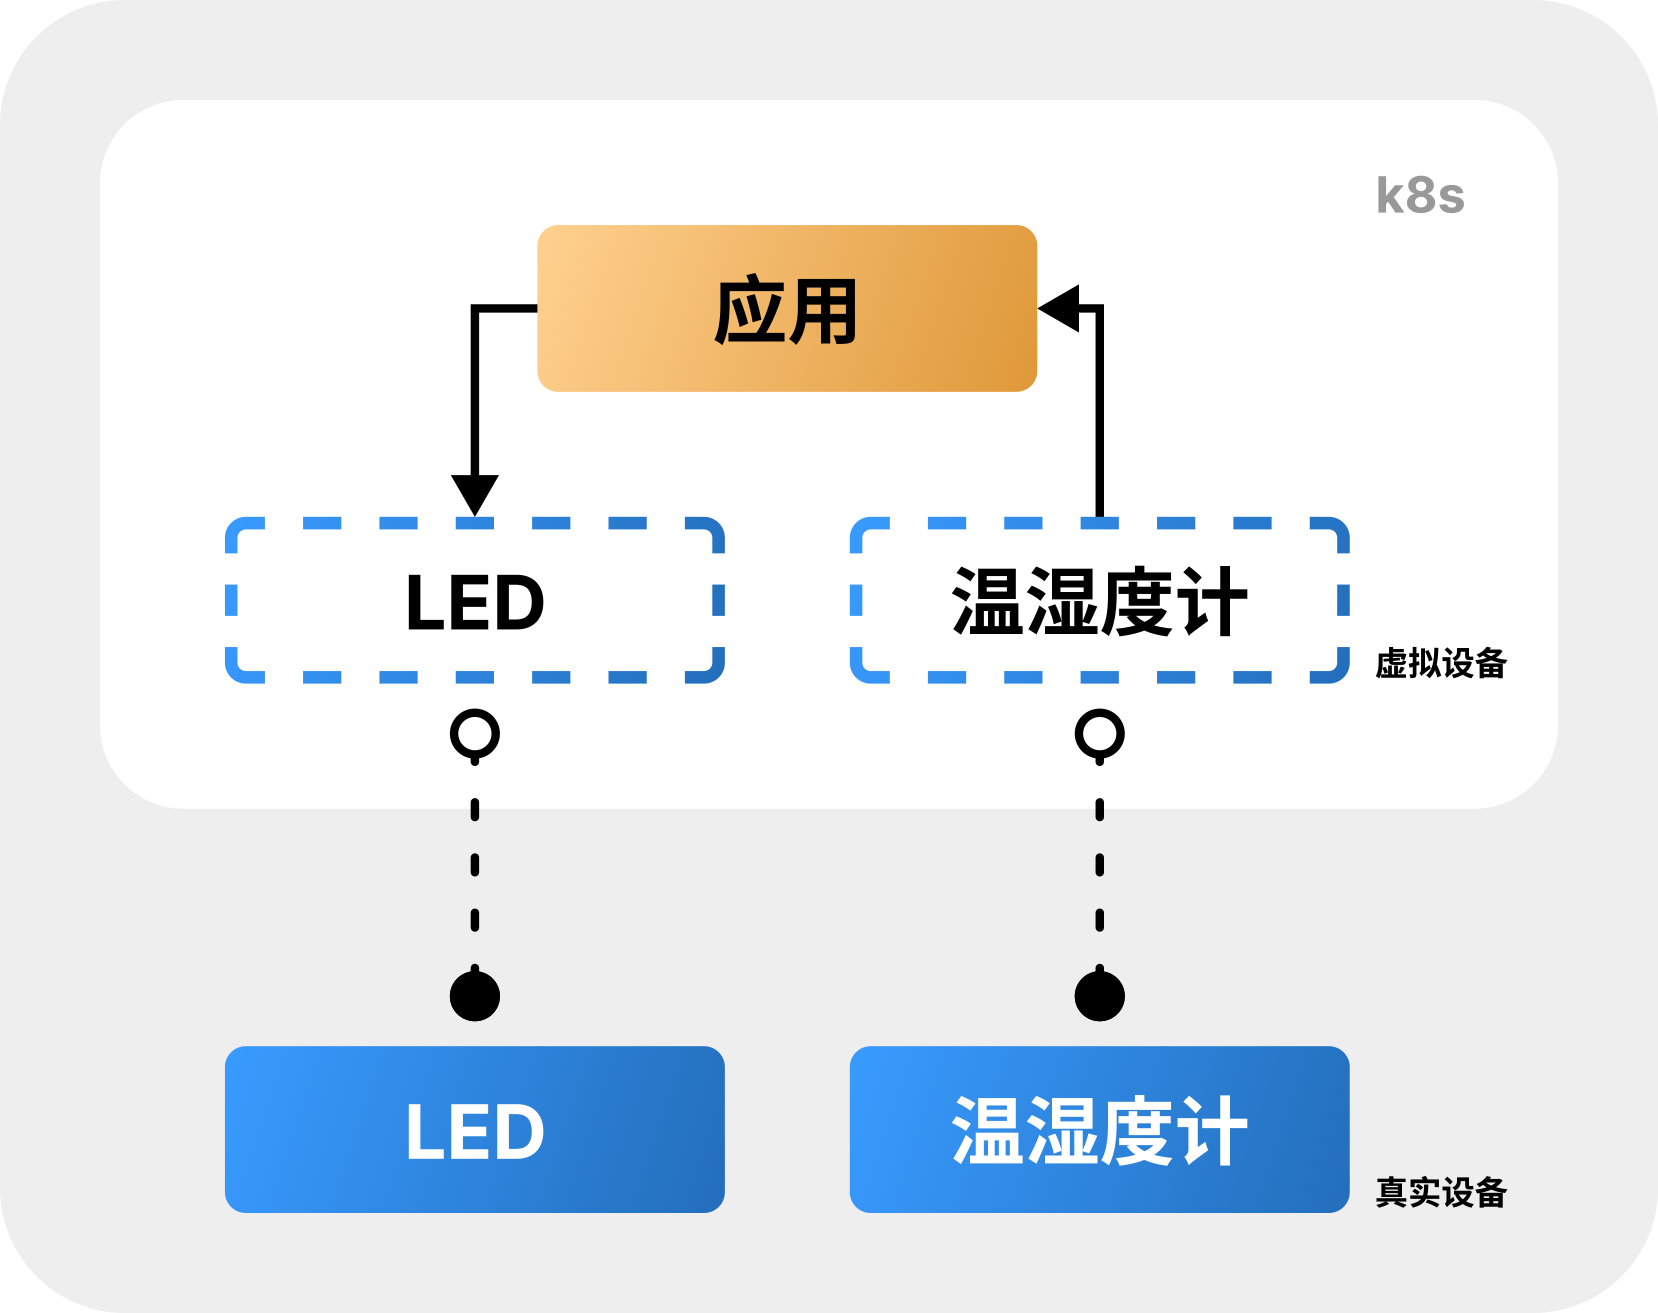
You can see the temperature and humidity are displayed alternely on the LED once the application is running.

files in current folder
main.py
import time
import requests
import json

isLocal = False
localIp = "192.168.31.138"
flag = -1
while True:
    flag += 1

    # [get data]
    if flag % 2 == 0:
        # get temperature
        url = f"http://{localIp}:23330/temperature" if isLocal else "http://my-thermometer.deviceshifu.svc.cluster.local/temperature"
    else:
        # get humidity
        url = f"http://{localIp}:23330/humidity" if isLocal else "http://my-thermometer.deviceshifu.svc.cluster.local/humidity"
    res = requests.get(url)

    # [converse data]
    try:
        value = json.loads(res.text)['value']
        print("DEBUG", value)
        # [display data]
        led_url = f"http://{localIp}:23331/setfloat?value={value}" if isLocal else f"http://my-led.deviceshifu.svc.cluster.local/setfloat?value={value}"
        requests.get(led_url)
    except:
        print("DEBUG", res.text)

    time.sleep(2)
requirements.txt
requests
Dockerfile
FROM python:3.9-slim-bullseye

COPY requirements.txt .
RUN pip install --no-cache-dir -r requirements.txt

COPY main.py .
CMD ["python3", "main.py"]
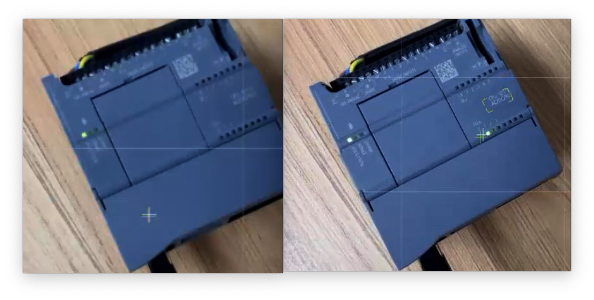
Simons PLC
Device Integration
First change the IP address to that of the PLC.
$ sudo docker pull edgehub/deviceshifu-http-http:v0.1.1
$ sudo docker pull edgehub/plc-device:v0.0.1
$ sudo kind load docker-image edgehub/deviceshifu-http-http:v0.1.1 edgehub/plc-device:v0.0.1
$ sudo kubectl apply -f examples/my_plc/plc-deployment
Interact with the Device
Here we modify one bit on the PLC and you can see the indicator light on the PLC turns on. In actual scenarios, the PLC will control large equipments such as an robotic arm.
$ sudo kubectl run nginx --image=nginx:1.21 -n deviceshifu
$ sudo kubectl exec -it nginx -n deviceshifu -- bash

$ curl "deviceshifu-plc/sendsinglebit?rootaddress=Q&address=0&start=0&digit=1&value=1"; echo
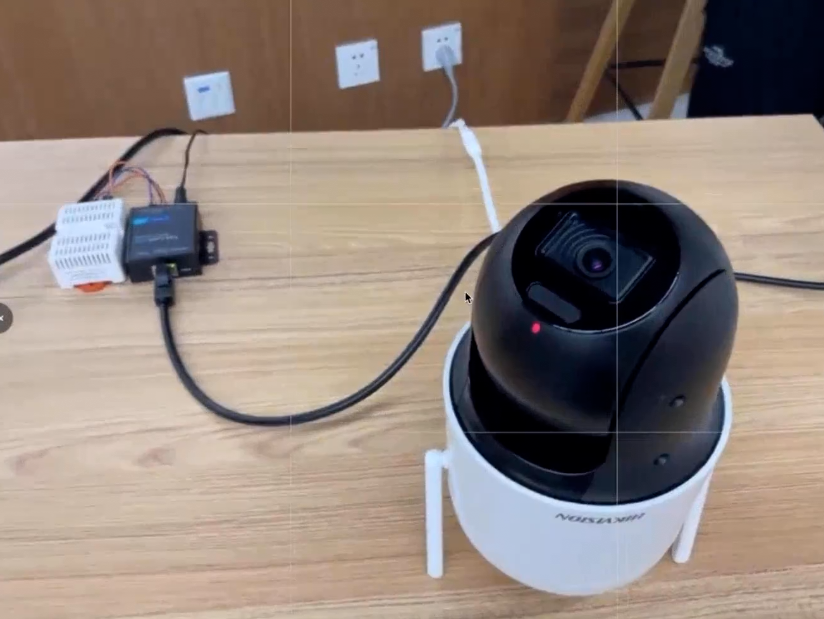
Hikivision Camera
Device Integration
Get the IP address of the camera and then replace the IP address in rtsp/camera-deployment/deviceshifu-camera-deployment.yaml.
$ sudo docker pull edgehub/deviceshifu-http-http:v0.1.1
$ sudo docker pull edgehub/camera-python:v0.0.1
$ sudo kind load docker-image edgehub/deviceshifu-http-http:v0.1.1 edgehub/camera-python:v0.0.1
$ sudo kubectl apply -f examples/my_rtsp/camera-deployment
Interact with Device
Check device information in cluster using nginx:
# Interact through `curl` in cluster
$ sudo kubectl exec -it nginx -- bash

$ curl http://deviceshifu-camera.deviceshifu.svc.cluster.local/info
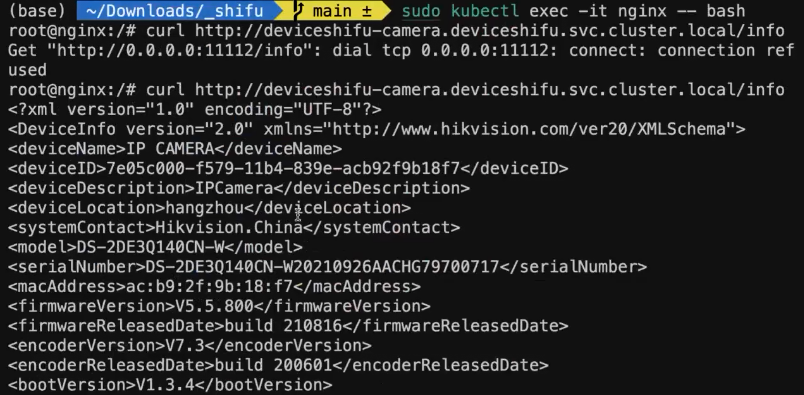
The command that the digital twin of the camera supports is:
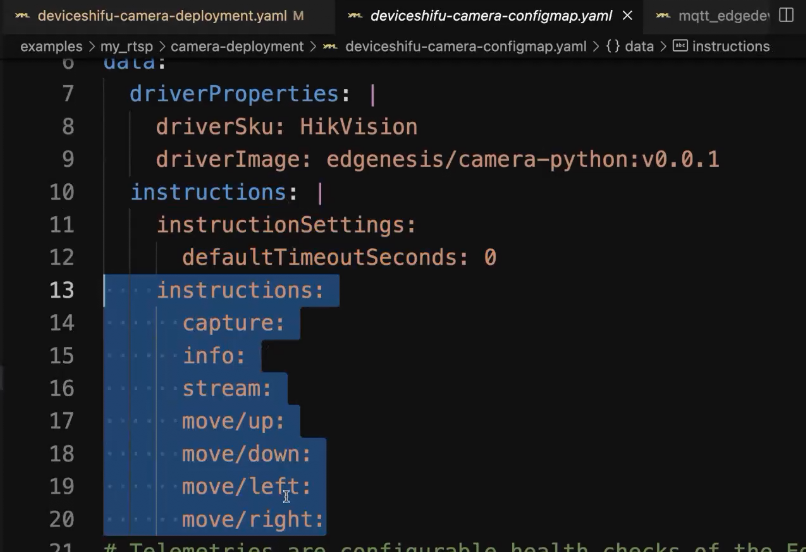
To view the images captured by the camera, we need to forward the port to the local machine and access it on the browser.
# Local browser access
$ sudo kubectl port-forward svc/deviceshifu-camera -n deviceshifu 8080:80
# Enter`localhost:8080/info`check information
# Enter`localhost:8080/capture`access pictures
# Enter`localhost:8080/move/{up|down|left|right}`move the camera
# Enter`localhost:8080/stream?timeout=0`access real-time streamline
Summary
The Shifu Meetup event was a huge success. As you can see Shifu enables developers to quickly access devices, unify various protocols to HTTP for easy management and subsequent application development. Shifu also has many advantages including running with no single point failure and good isolation.
If you are interested in Shifu, please visit Shifu official website to learn more. You are also welcome to give the project a star at Shifu's GitHub repository!