Integrate WasmEdge in Shifu to Cleanse Data
This article will briefly describe how to integrate WasmEdge into Shifu to cleanse data collected from IoT devices.
Background 🌇
When we use Shifu to collect data, it usually happens that the data collected from the device is in a different format from the data we need. To solve this problem, we can use Shifu + WasmEdge to process the data collected by Shifu through WasmEdge and then return it to our application.
The following is the simple logic.
WasmEdge Introduction 🏬WasmEdge is a lightweight, high-performance WebAssembly(WASM) virtual machine optimized for the edge. WasmEdge can be used in a variety of scenarios such as severless cloud functions, SaaS, blockchain smart contracts, IoT, automotive real-time software applications, etc.
Prepare 🗂
kubectlv1.24.2docker20.10.16kindv0.14.0git2.36.1
Deployment 🔨
To make this article faster for you, you can download the program from Github with the following command. 🚀
git clone https://github.com/Edgenesis/wasm-shifu-demo.git
cd wasm-shifu-demo
Create a K8s Cluster 🐝
Use the following command to create a k8s cluster.
$ kind delete cluster && kind create cluster
Creating cluster "kind" ...
 ✓ Ensuring node image (kindest/node:v1.24.0) 🖼
 ✓ Preparing nodes 📦
 ✓ Writing configuration 📜
 ✓ Starting control-plane 🕹️
 ✓ Installing CNI 🔌
 ✓ Installing StorageClass 💾
Set kubectl context to "kind-kind"
You can now use your cluster with:
kubectl cluster-info --context kind-kind
Have a question, bug, or feature request? Let us know! https://kind.sigs.k8s.io/#community 🙂
Build Shifu image 🪞
Use the following command to build a Shifu image.
$ make -f shifu/Makefile build-image-deviceshifu
$ kind load docker-image edgehub/deviceshifu-http-http:v0.0.6
$ docker images | grep edgehub/deviceshifu-http-http
edgehub/deviceshifu-http-http v0.0.6 1d6b3544b8ad 54 minutes ago 36.1MB
Run Virtual Devices 🔌
To make your experience easier, here we use a virtual appliance for simulation.
Install and run the virtual appliance with port number 8099.
$ docker build -f mockDevice/dockerfile -t mockdevice:v0.0.1 .
$ docker run -p 8099:8099 -itd mockdevice:v0.0.1
bdfd2b1323be mockdevice:v0.0.1 ". /mockDevice" 19 seconds ago Up 18 seconds 0.0.0.0:8099->8099/tcp admiring_feistel
Write Rules & Compile Wasm
You can write rules by using JavaScript. If you are not familiar with JavaScript, you can just use the default rules. 🥮
Rule file path: wasmEdge/js-func/src/js/run.js You can achieve different functions by modifying the rule.
$ docker build -t wasm:v0.0.1 -f wasmEdge/js.dockerfile .
$ kind load docker-image wasm:v0.0.1
$ kubectl apply -f wasmEdge/k8s
You can check the pod operation of WasmEdge with the following command.
$ kubectl get pod -n wasmedge
NAME READY STATUS RESTARTS AGE
wasm-deployment-fbc9564d8-td428 1/1 Running 0 1s
Install and Run Shifu
Install Shifu.
$ kubectl apply -f shifuConfig/shifu_install.yml
$ kubectl get pod -n shifu-crd-system
NAME READY STATUS RESTARTS AGE
shifu-crd-controller-manager-5bbdb4d786-s6h4m 2/2 Running 0 1s
Install deviceShifu to connect with mockDeivce. Before doing so, please change the address in the shifuConfig/task3/task3.yaml file to the IP of your computer.
spec:
  sku: "E93"
  connection: Ethernet
  address: "192.168.14.163:8099"
Deploy and run deviceShifu with the following command. 🏖
$ kubectl apply -f shifuConfig/task3
$ kubectl get pod -n deviceshifu
NAME READY STATUS RESTARTS AGE
deviceshifu-demodevice-deployment-5589b55569-l5nb2 1/1 Running 0 4s
Experience 🕹
You can start a nginx to communicate with deviceShifu.
$ kubectl run nginx --image=nginx:1.21
$ kubectl get pod
NAME READY STATUS RESTARTS AGE
nginx 1/1 Running 0 3s
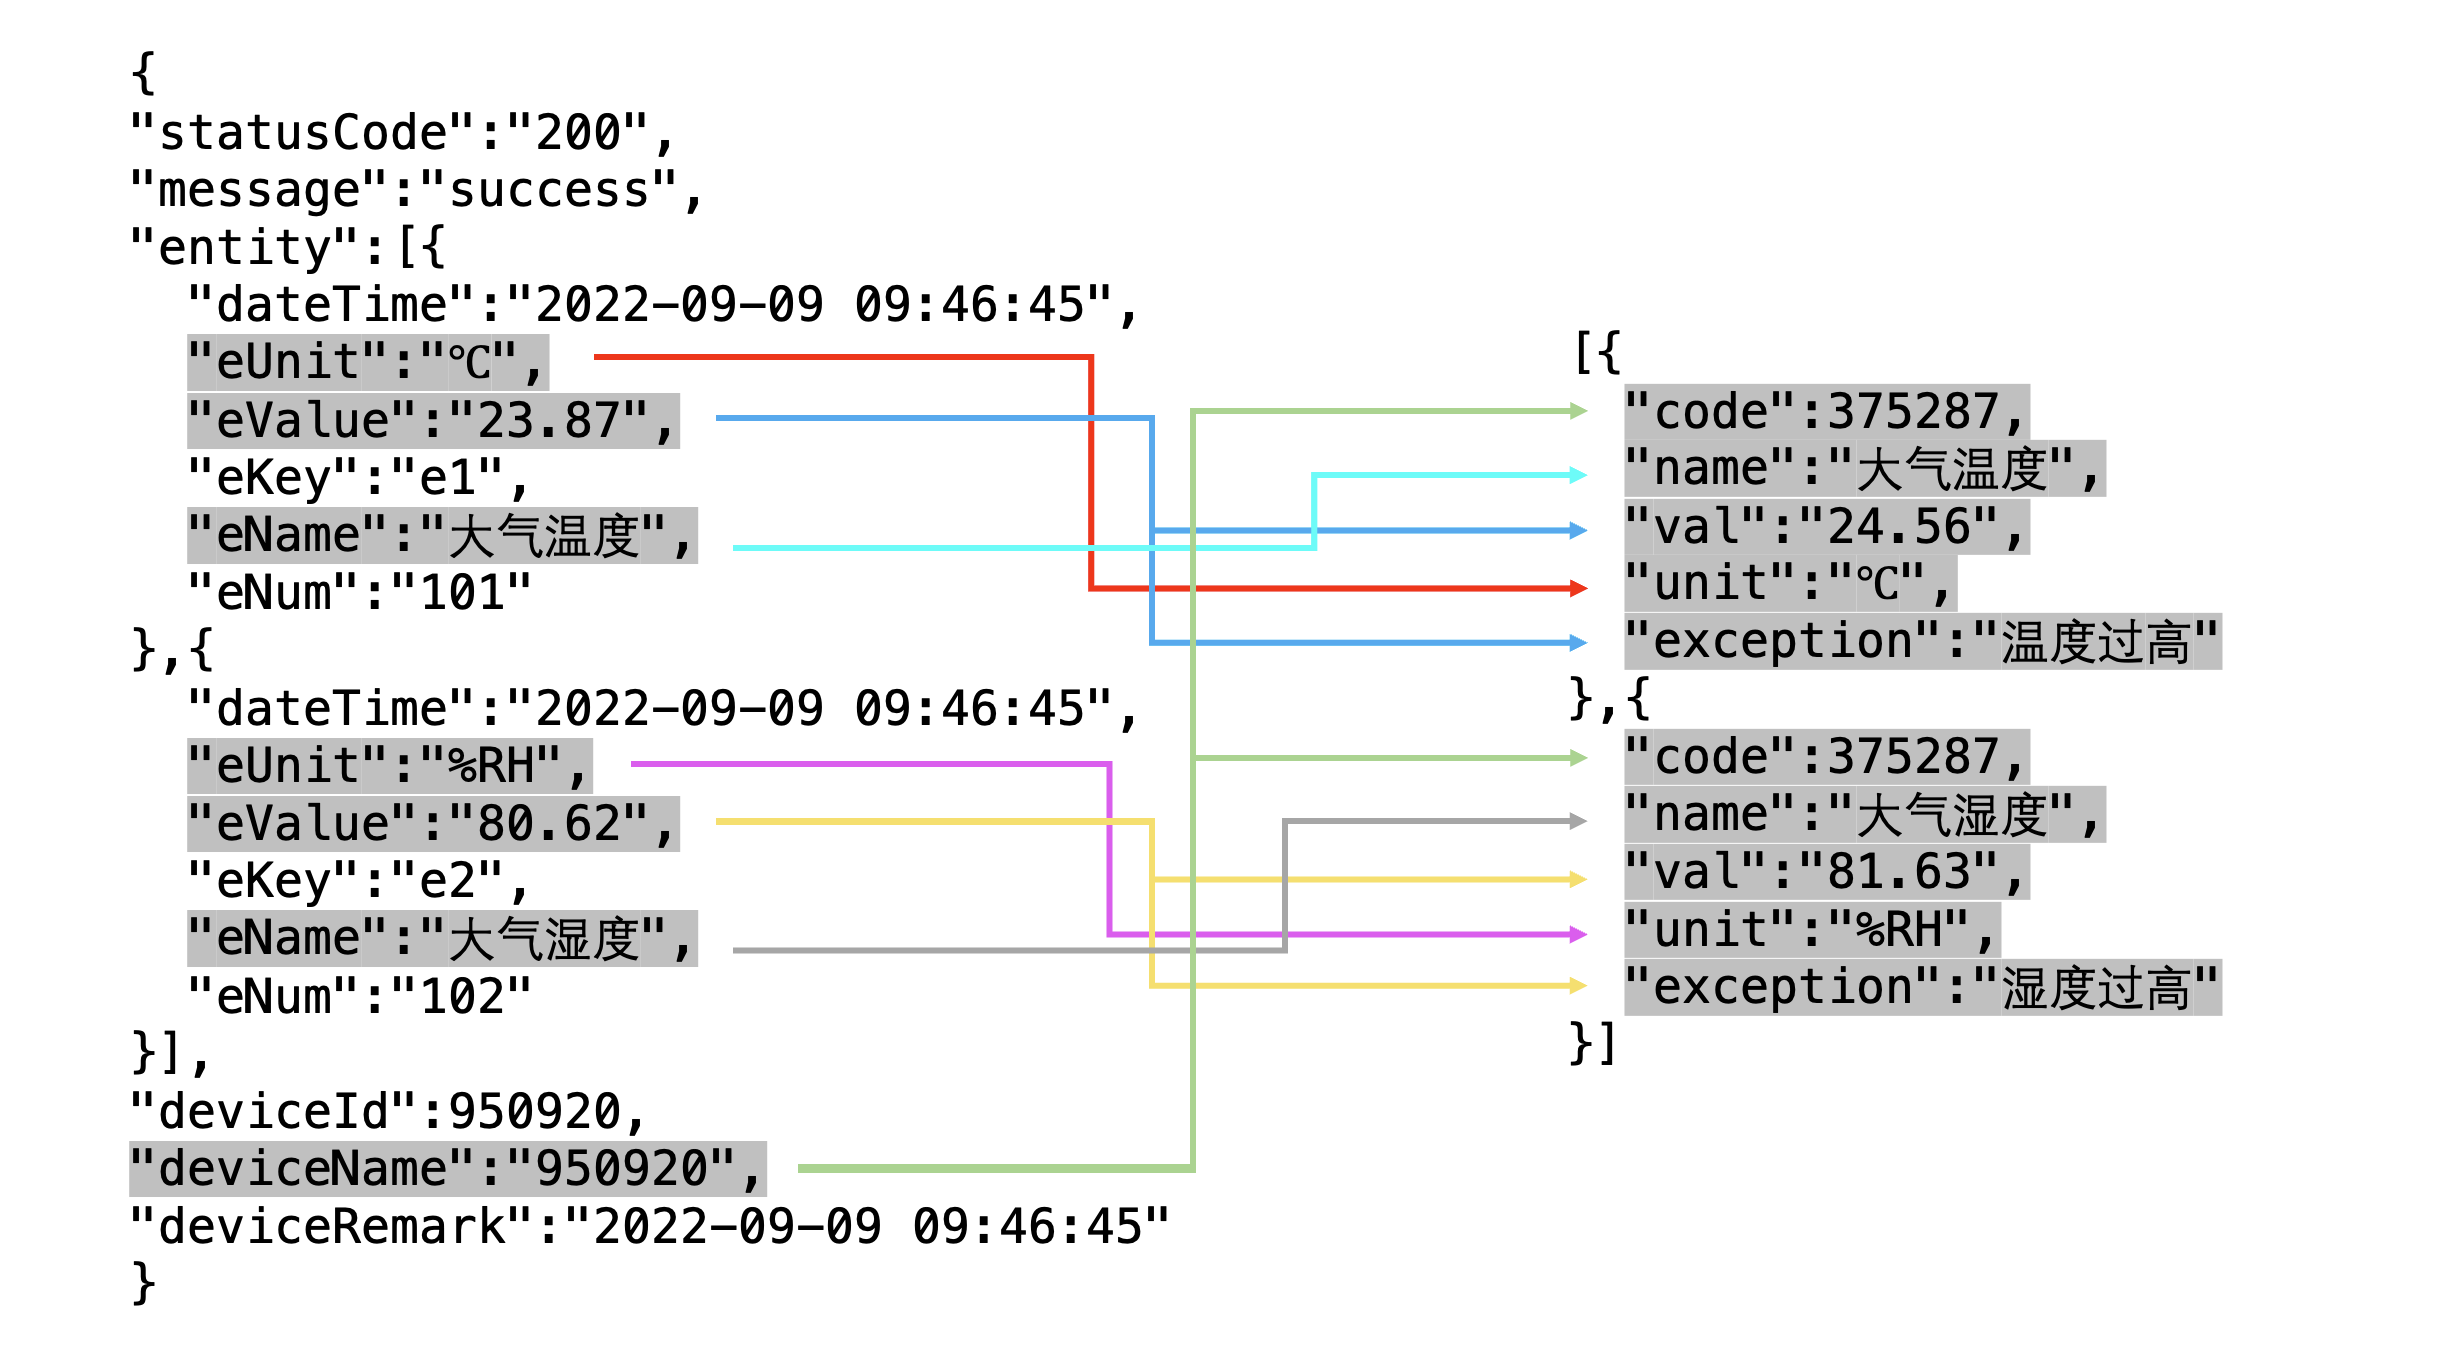
With the following command, you can interact with Shifu to clean the data collected from IoT devices. 🛁
$ kubectl exec -it nginx -- curl -v http://deviceshifu-demodevice-service.deviceshifu.svc.cluster.local/get_info;echo
[
   {
      "code":375287,
      "name": "atmospheric temperature",
      "val": "24.56",
      "unit":"°C",
      "exception": "Temperature is too high"
   },
   {
      "code":375287,
      "name": "Atmospheric Humidity",
      "val": "81.63",
      "unit":"%RH",
      "exception": "Humidity too high"
   }
]
Also we can use the following command to check the data generated by the IoT device.
$ curl localhost:8099/getInfo
{
   "statusCode": "200",
   "message": "success",
   "entity":[
      {
         "dateTime": "2022-09-09 09:46:45",
         "eUnit":"℃",
         "eValue": "23.87",
         "eKey": "e1",
         "eName": "Atmospheric temperature",
         "eNum": "101"
      },
      {
         "dateTime": "2022-09-09 09:46:45",
         "eUnit":"%RH",
         "eValue": "80.62",
         "eKey": "e2",
         "eName": "Atmospheric Humidity",
         "eNum": "102"
      }
   ],
   "deviceId":950920,
   "deviceName": "950920",
   "deviceRemark": "2022-09-09 09:46:45"
}
Comparing the two outputs, we can see that we have successfully collected and cleaned the data to get the data we want. The comparison chart is as follows :