在这一篇文章中,我们会先��使用 Python 编写一个 GPIO 的驱动控制 LED,之后将其接入 Shifu 进行交互和管理。
创建驱动
- 完成简单LED电路连接
- 基本的树莓派/SSH配置
- 基本的Python语法以及GPIO库知识
所用设备
- 树莓派
Raspberry Pi 3B+ 运行64位 Raspberry Pi OS
- 1个面包板
- 3个LED灯泡(红 黄 绿)
- 1个330欧姆的电阻
需要的基本知识
- 简单的Python语法
- Linux命令行基本操作(创建文件 安装应用 SSH 运行程序)
第一步 电路设计
首先我们来设计一下电路,我们需要设计一个电路,可以让树莓派的GPIO输出来控制单个LED灯泡的开/关。本文采用了最直接的办法,即直接使用GPIO来对LED灯泡进行供电。
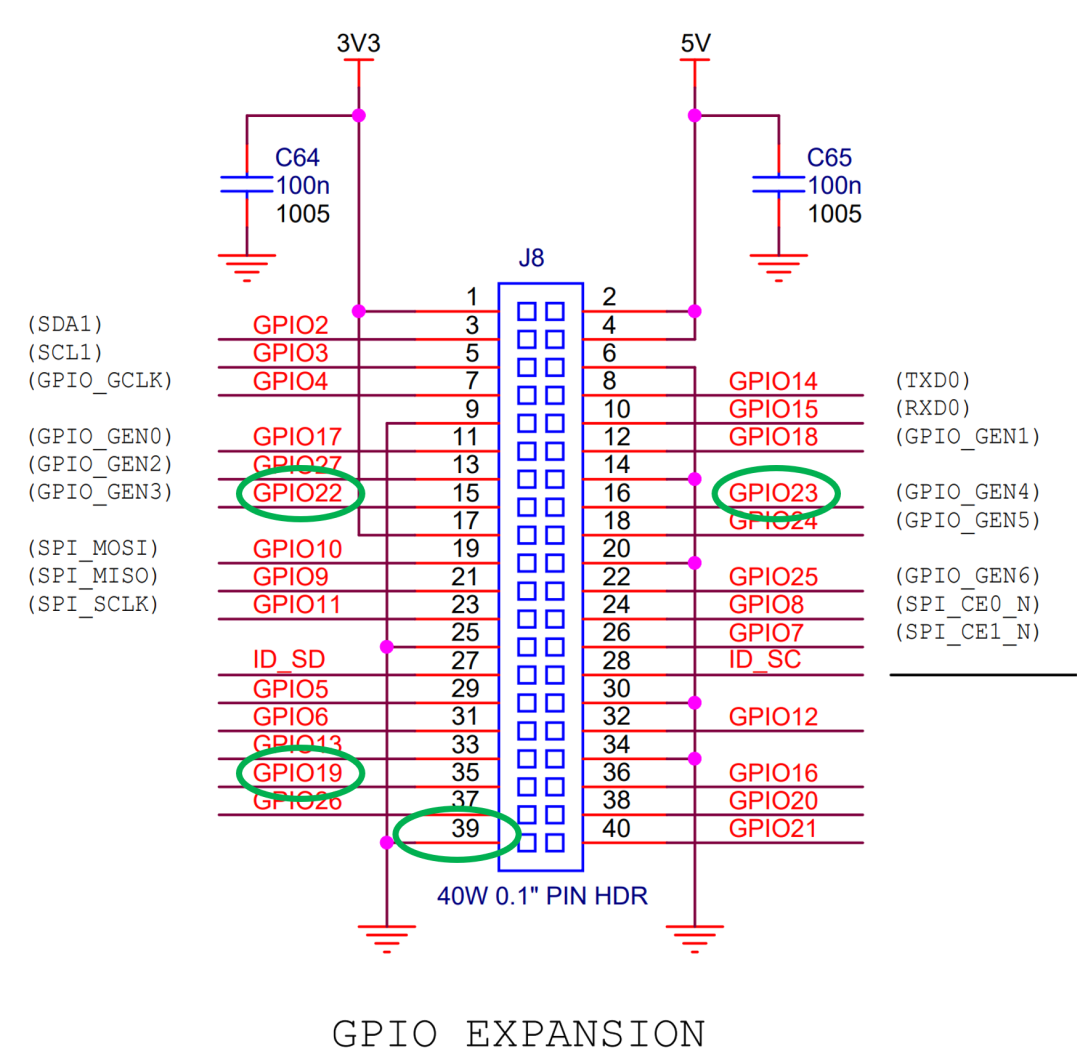
电路图如��下:
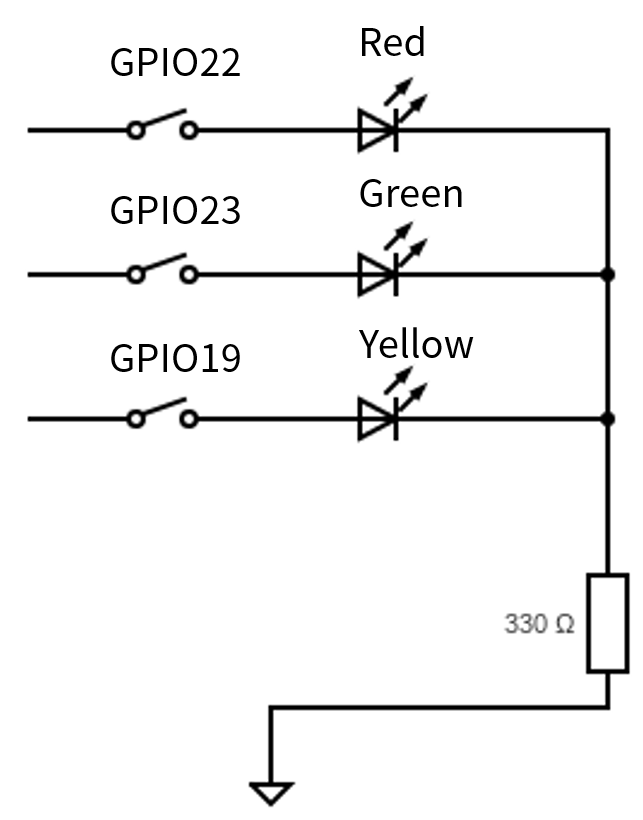
图中GPIO的22,23,19针分别控制了红,绿,黄三个LED。最后串联的330欧电阻是为了防止LED电流过大烧毁。
第二步 电路实施
根据Raspberry Pi官方文档中的针脚布局(Pin Layout),我们可以看到针脚的具体位置,这里用到了第15,16,35,39号针脚:
将这四个针脚接上线缆的母口,然后在面包板上将剩余的电路连接好:
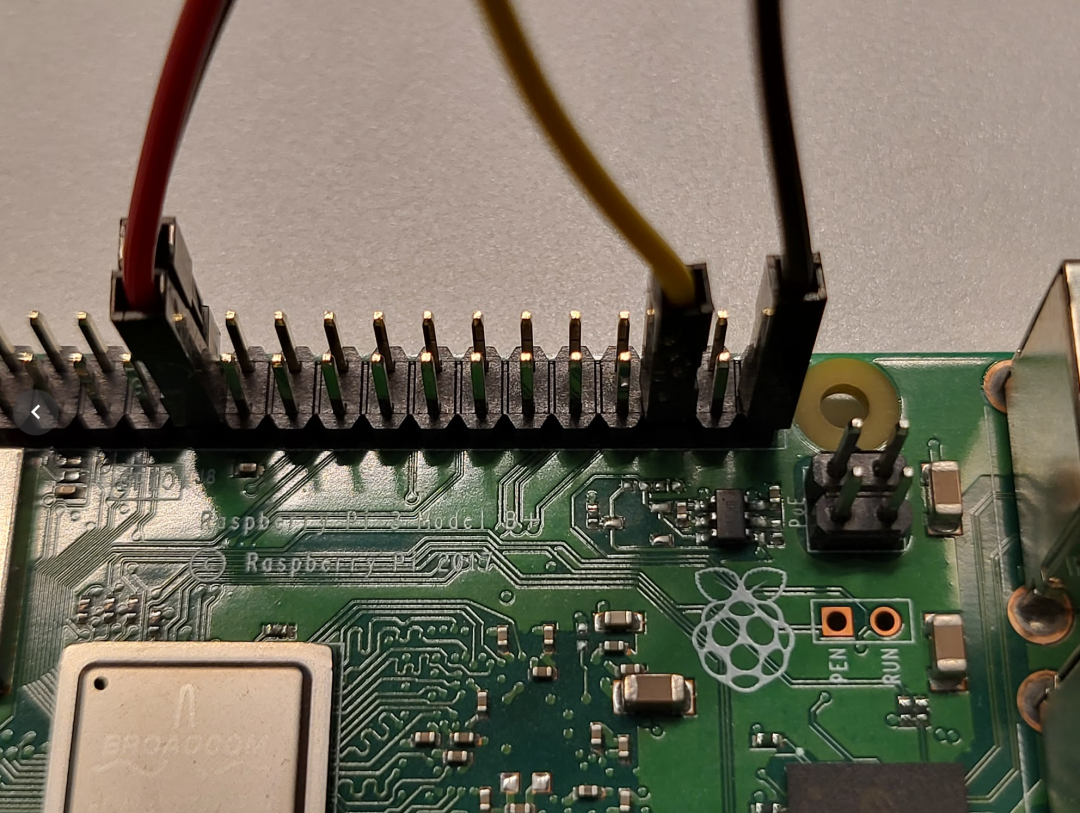
图中红,绿,黄,灰线缆分别对应了GPIO22 GPIO23 GPIO19和地(ground)。
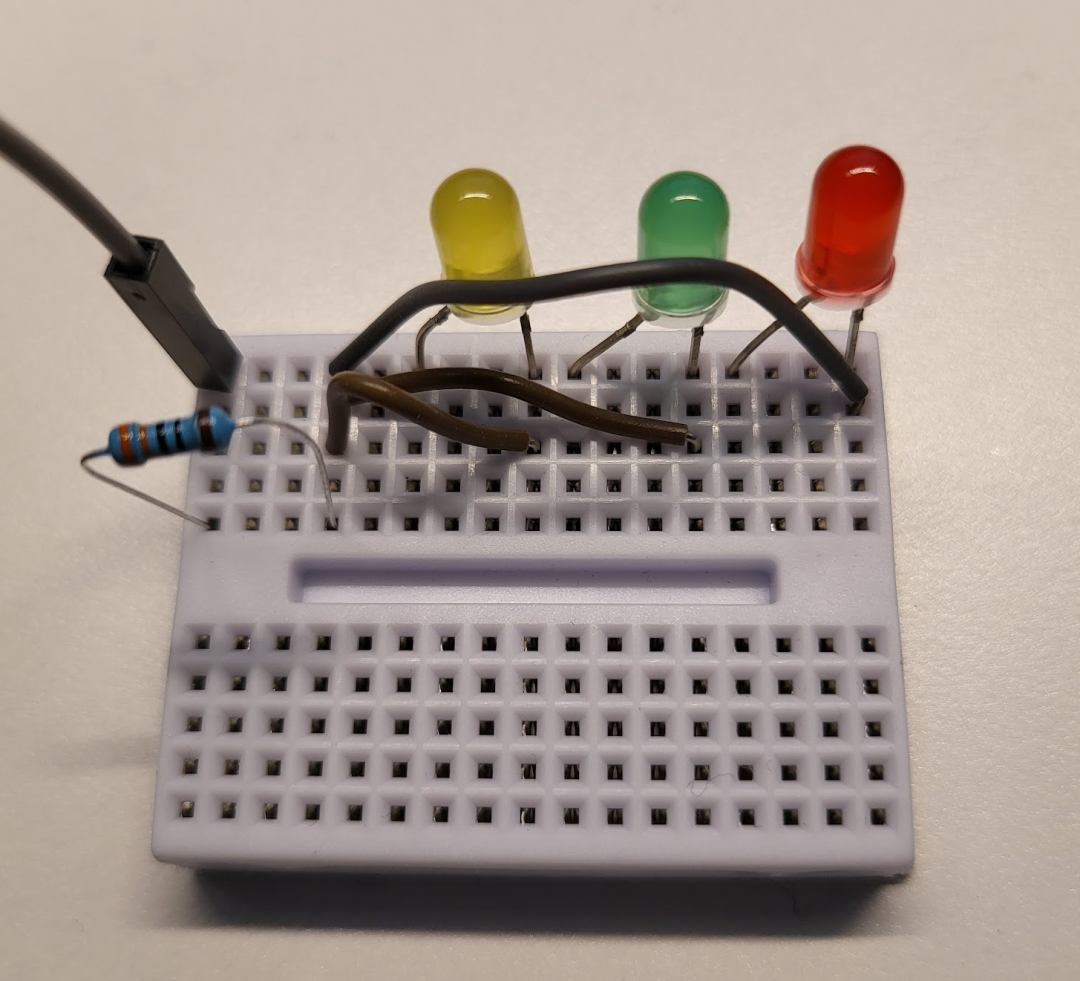
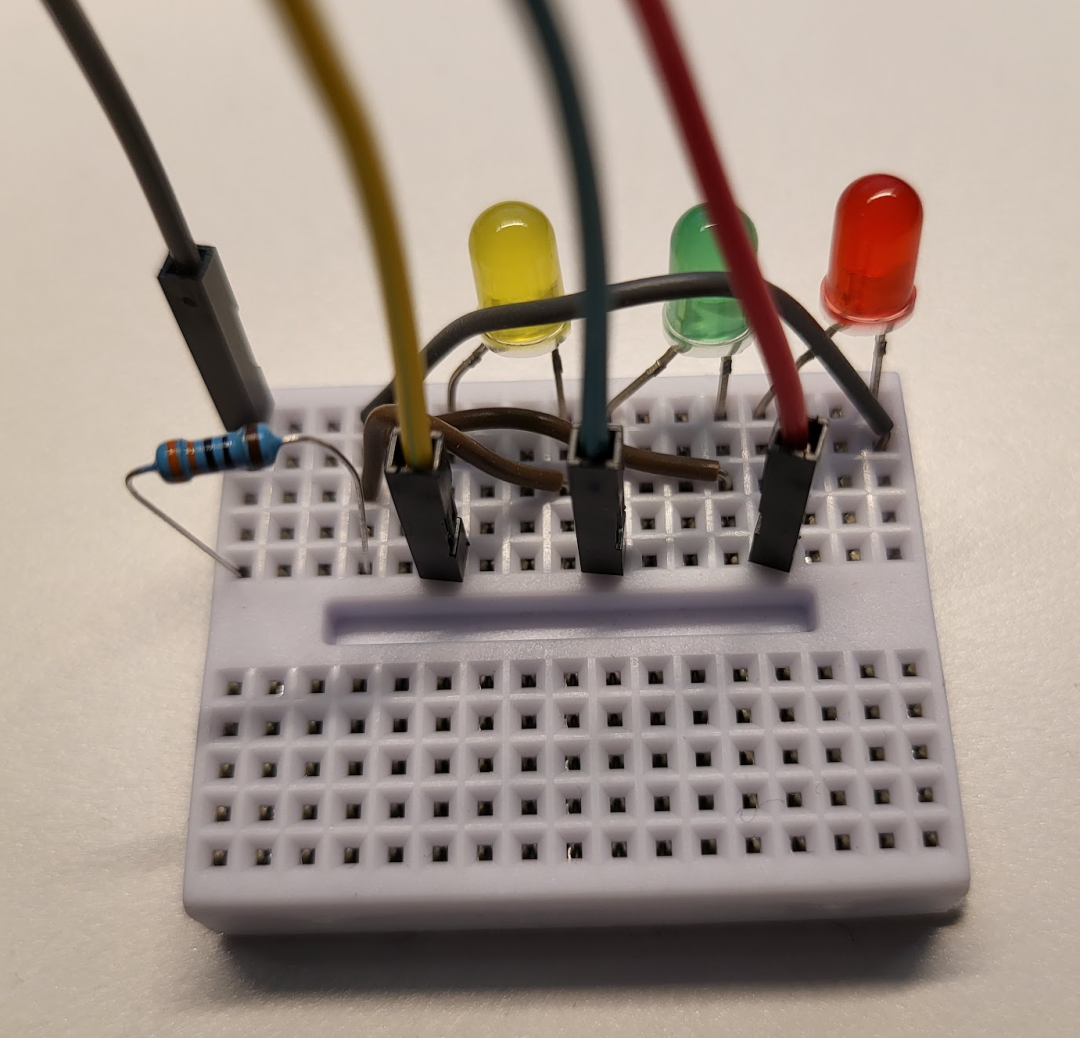
至此,电路设计与连接部分结束。
第三步 树莓派准备
首先在树莓派中安装一个操作系统,本文中用到的是 Raspberry Pi OS (64-bit)。下载链接
将SD卡插入读卡器,连接到电脑的USB端口中,再将下载后的压缩包通过 balenaEtcher 刷入SD卡即可。balenaEtcher链接
将SD卡放入树莓派,插入电源,显示器即可开始配置。
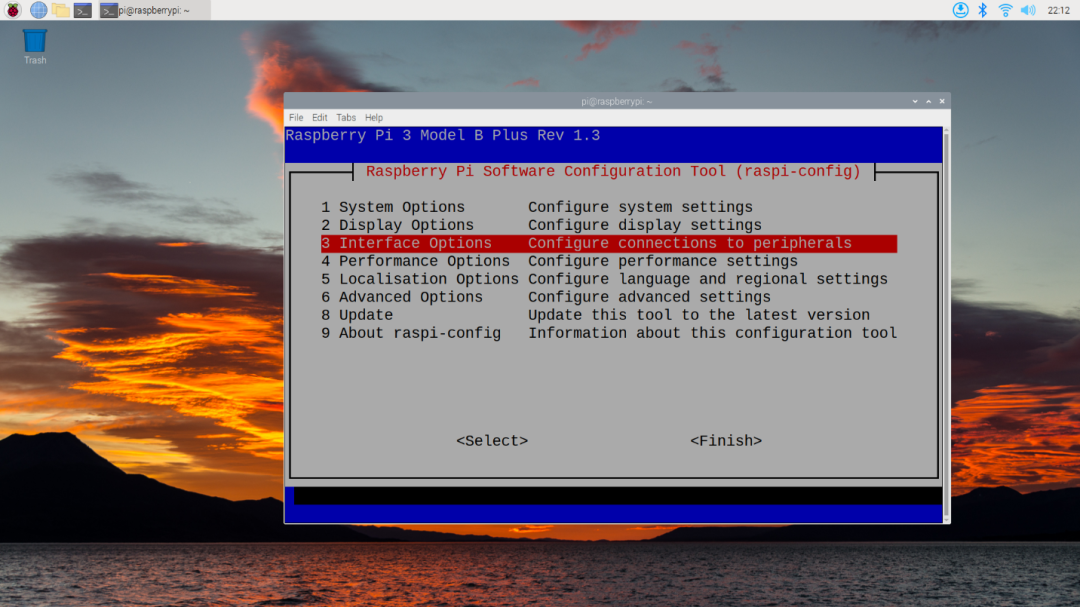
首先,为了方便开发/调试我们需要开启SSH,从桌面上开启终端,然后输入 sudo raspi-config 来进入配置界面,选择 Interface Options:
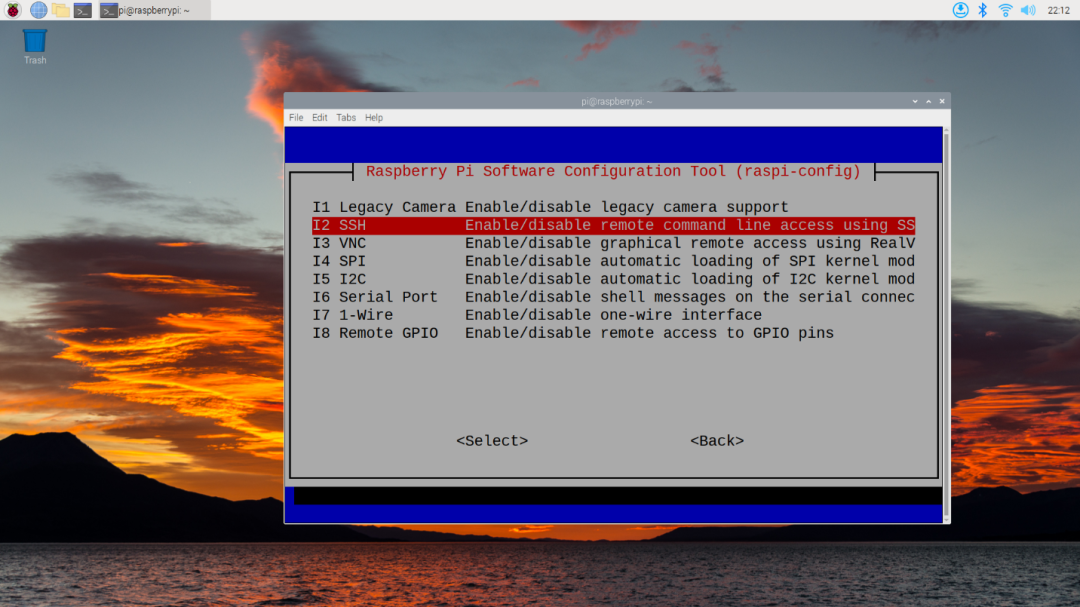
选择 SSH:
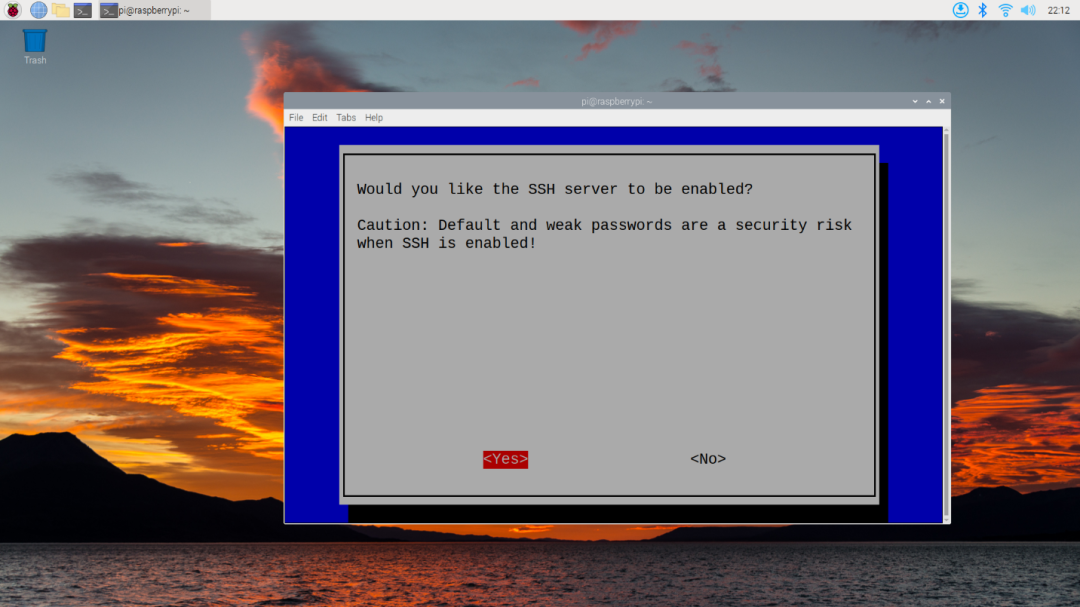
按回车,接着按左键选择Yes来开启SSH服务:
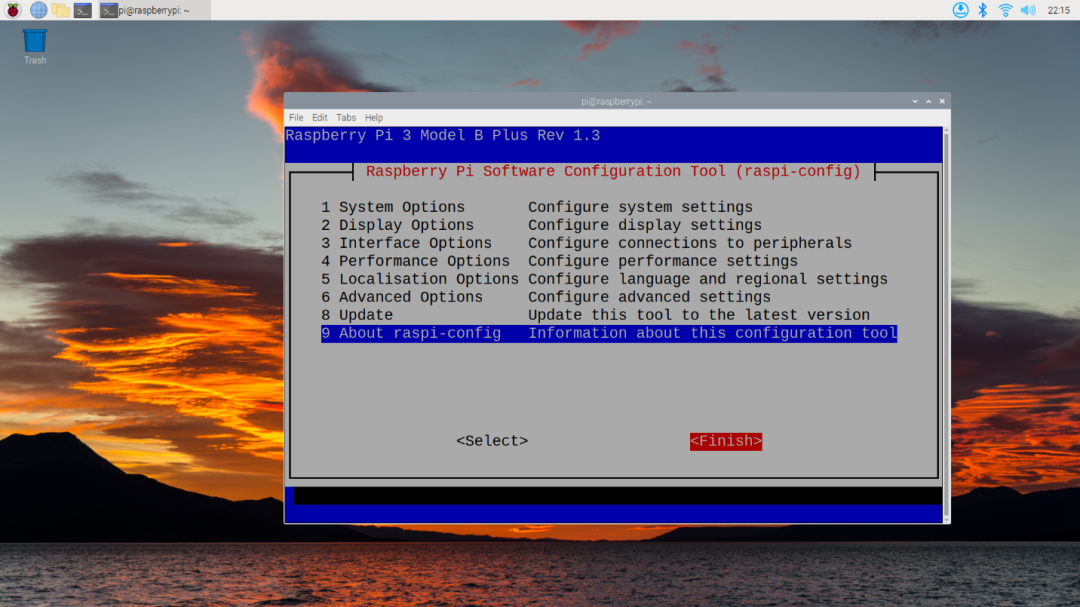
之后按右选择Finish,再回车退出即可:
这时,SSH服务已经开启了,但是我们需要知道树莓派的IP才可以SSH,这里我们通过系统自带的 ip addr 来查看:

可以看到,IP地址为 192.168.15.122。
回到电脑中,通过 ssh pi@192.168.15.122 即可以远程进入到树莓派的命令行中
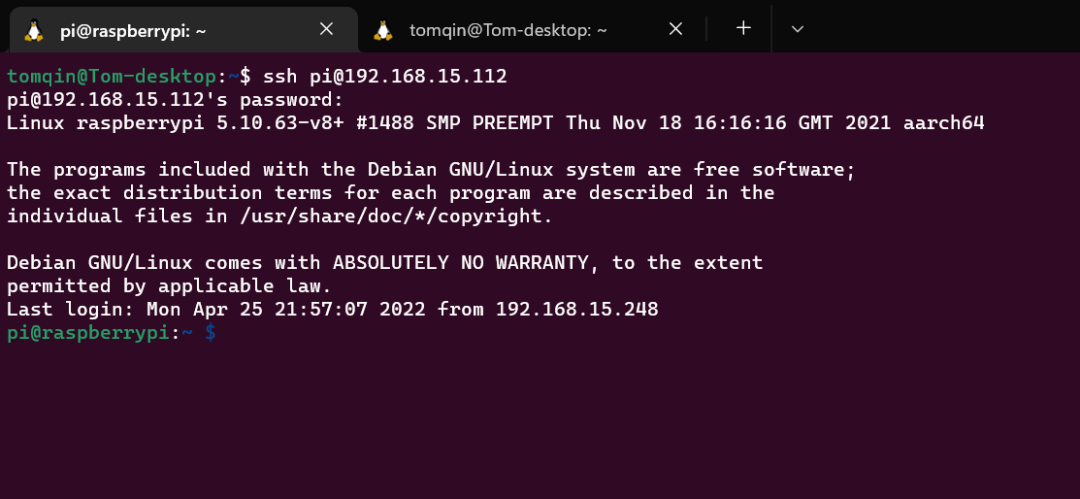
至此,树莓派以及硬件的准备就结束了。
第四步 驱动编写
一切就绪,现在我们来编写第一个驱动!
首先先确保系统中安装了 Python,如果没有的话可以运行如下命令:
$ sudo apt-get update && sudo apt install python3 -y
安装完毕后可以通过 python -V 来检查安装状态,如显示版本则成功:
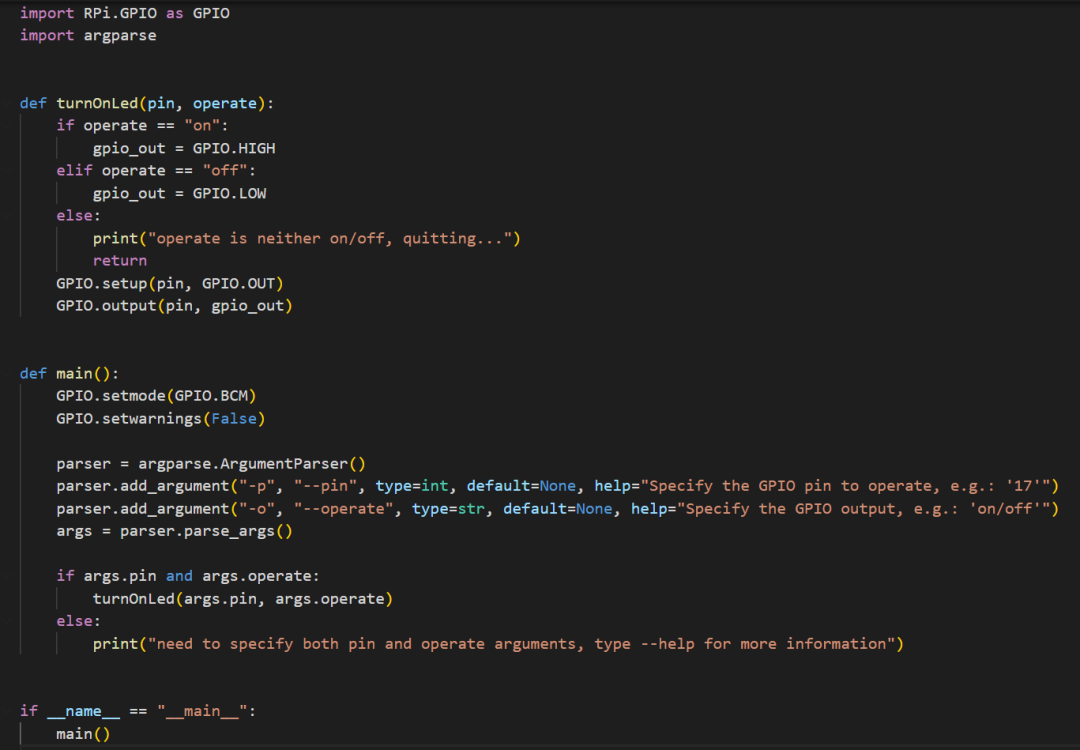
接下来让我们先从一个LED灯泡控制开始,我们要控制红色LED的亮/灭,使用以下代码:
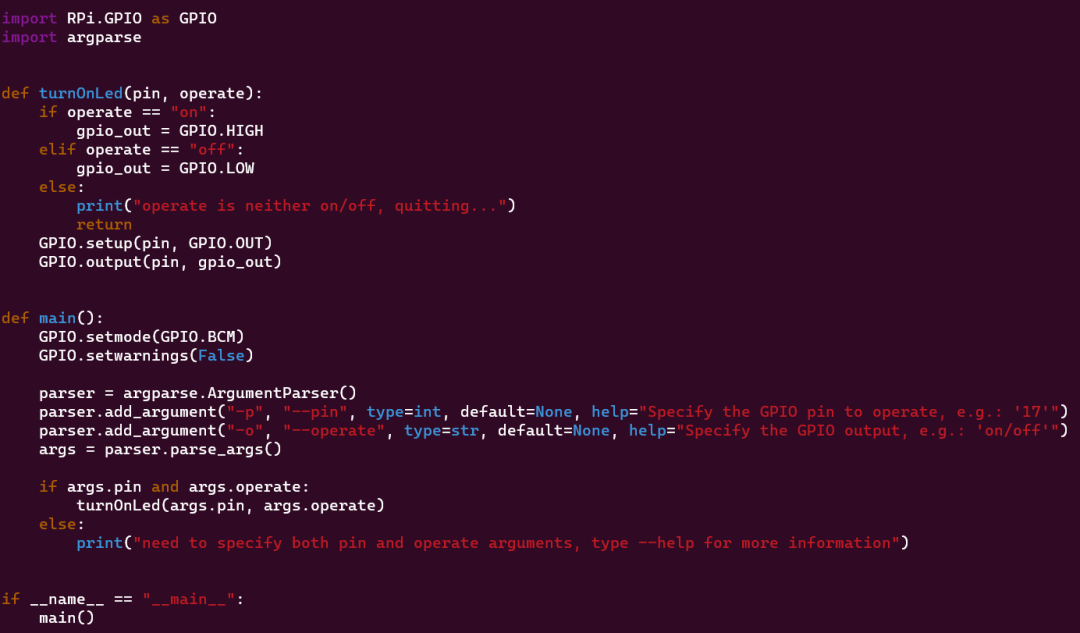
驱动中用到的模块有:
RPi.GPIO 用来控制树莓派的GPIOargparse 用来解析命令行输入
先将GPIO的模式置到GPIO.BCM模式,在这个模式下针脚的数字为GPIO的数字,非树莓派板上的针脚顺序。
GPIO.setmode(GPIO.BCM)
然后将警告关闭,本文中树莓派只会被这一个驱动程序控制
GPIO.setwarnings(False)
接下来处理一下程序输入,本驱动程序会接受两个输入:
-p, --port, 代表程序操控的GPIO针-o, --operate, 代表程序对于GPIO针的操作,on 代表电路中的 1, 即 3.3V,off 代表电路中的 0, 即 0V
这段代码为:
parser = argparse.ArgumentParser()
parser.add_argument("-p", "--pin", type=int, default=None, help="Specify the GPIO pin to operate, e.g.: '17'")
parser.add_argument("-o", "--operate", type=str, default=None, help="Specify the GPIO output, e.g.: 'on/off'")
args = parser.parse_args()
接下来是一些错误处理,当针脚数和操作不为空时,将参数传入函数 turnOnLed 进行操作,否则打印出警告:
if args.pin and args.operate:
    turnOnLed(args.pin, args.operate)
else:
    print("need to specify both pin and operate arguments, type --help for more information")
主程序部分结束,下面我们看一下控制LED灯泡的函数 turnOnLed。
首先是对传参的判断,确定 operate 变量为 on 或者 off ,否则返回。当变量为 on 的时候,将输出变量 gpio_out 设为 GPIO.HIGH,off 时则设为 GPIO.LOW。
这两个值分别代表了开或者关:
if operate == "on":
    gpio_out = GPIO.HIGH
elif operate == "off":
    gpio_out = GPIO.LOW
else:
    print("operate is neither on/off, quitting...")
    return
最后,就是将该针脚的模式设为输出:GPIO.setup(pin, GPIO.OUT)
并将针脚的输出切换到开/关:GPIO.output(pin, gpio_out)
运行效果
程序通过 python led_driver.py -p {pin #} -o {operate} 来操控
如果想让红色灯泡亮,我们执行 python led_driver.py -p 22 -o on
至此,给树莓派编写的简单控制LED灯泡驱动就编写完成了!
本质上这个驱动实现了树莓派GPIO针的操控,所以我们也可以使用这个驱动来操控任意可以被3.3V控制的电路,针脚也不仅限于本文中的22,23和19。大家可以自行发挥想象力制作各式各样的测试电路。
接入Shifu
接下来我们使用刚刚编写的驱动接入 Shifu 框架进行交互和管理。
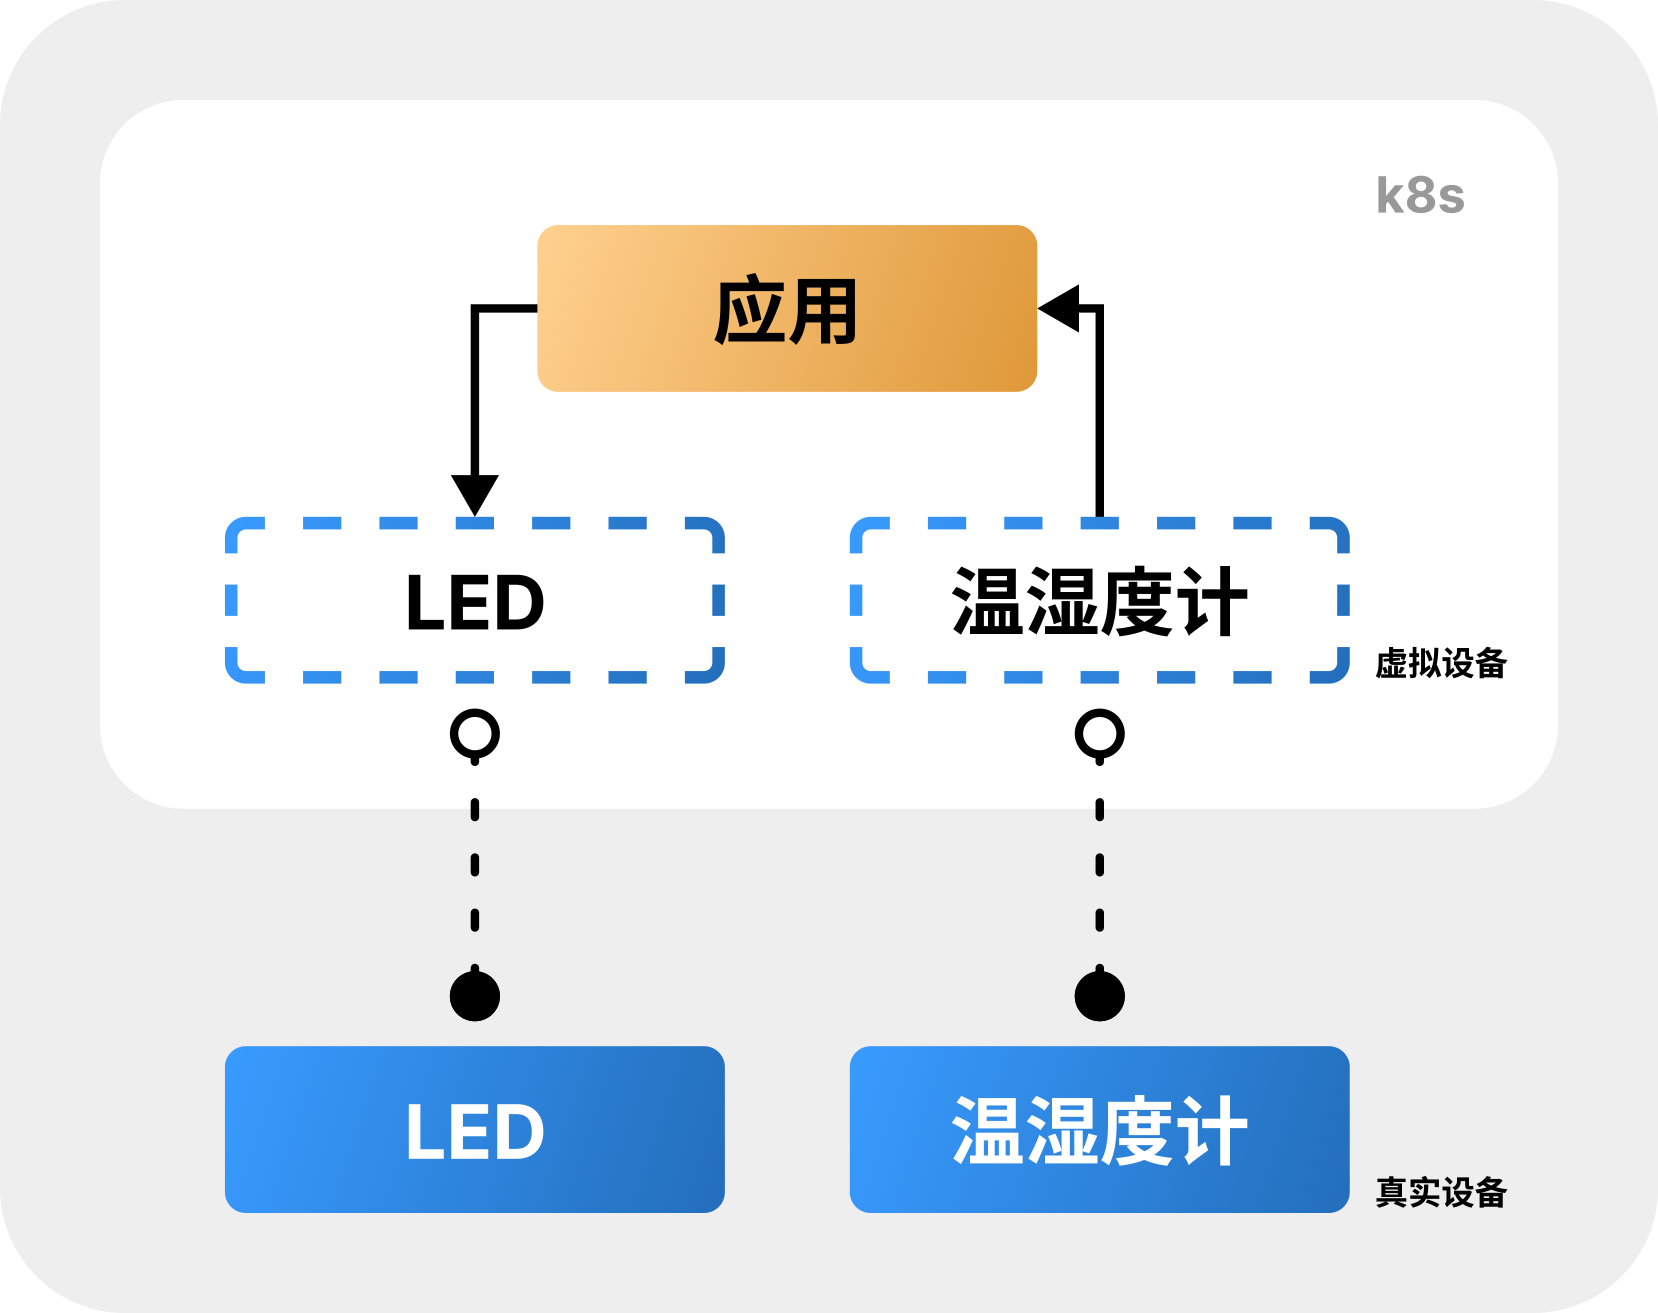
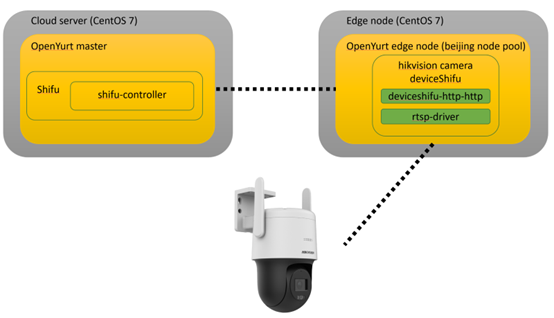
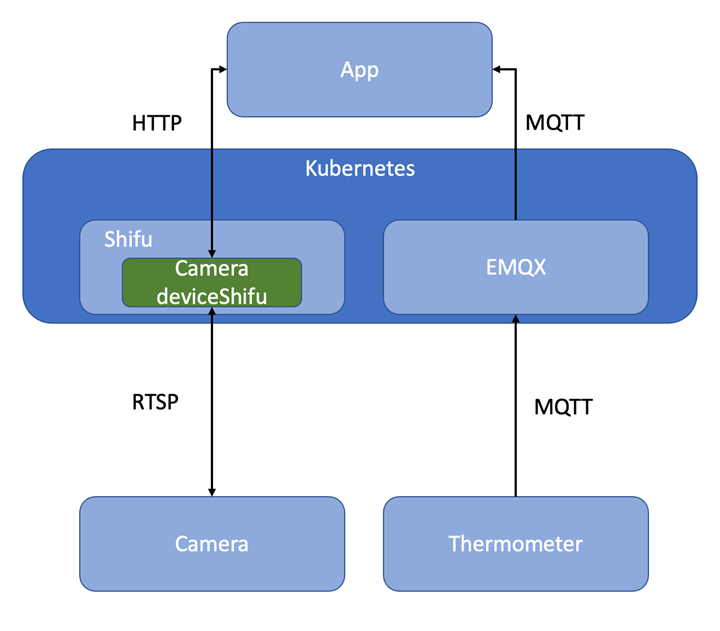
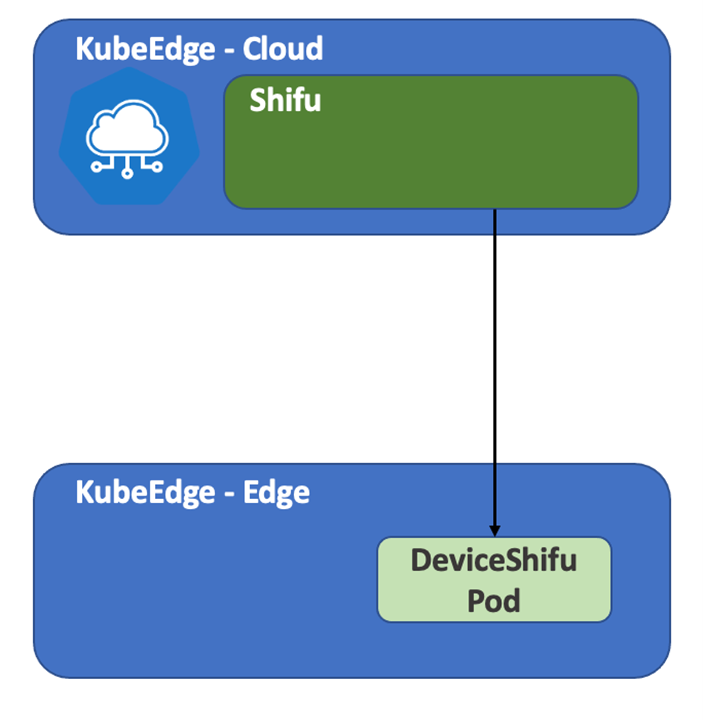
本文中的 Shifu 架构如下:
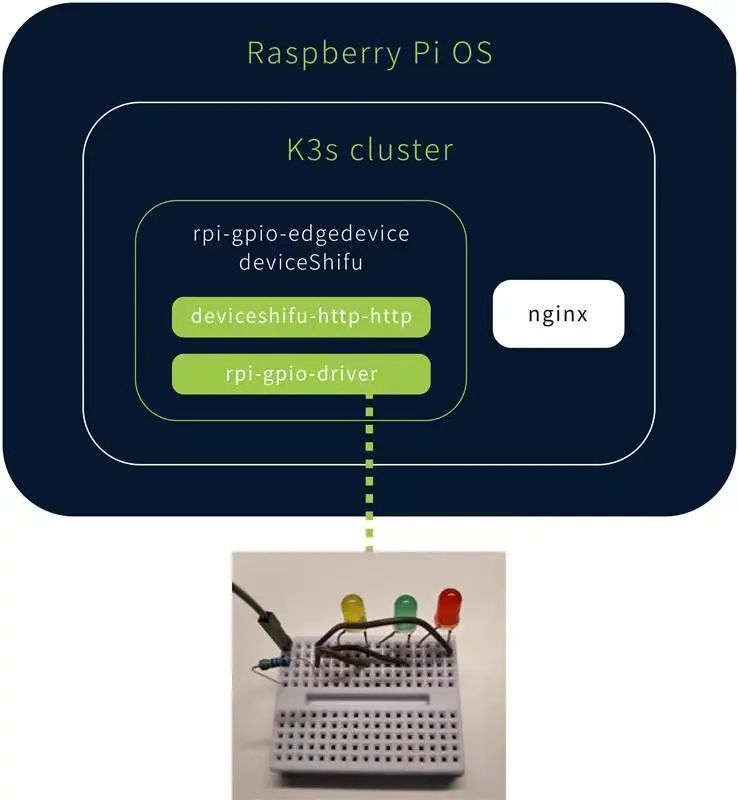
北向通过 deviceshifu-http-http 向上开放 HTTP API接口,南向通过 rpio-gpio-driver 来和实际设备交互。
- 在树莓派上安装k3s集群并安装Shifu Framework
- 打包树莓派LED驱动到一个容器镜��像
- 在Shifu中部署树莓派LED的数字孪生
- 实现对树莓派LED的远程自动化管控
所用设备
- 树莓派
Raspberry Pi 3B+ 运行64位 Raspberry Pi OS
需要的基本知识
- Docker/containerd基本操作
- K8s/K3s基本操作
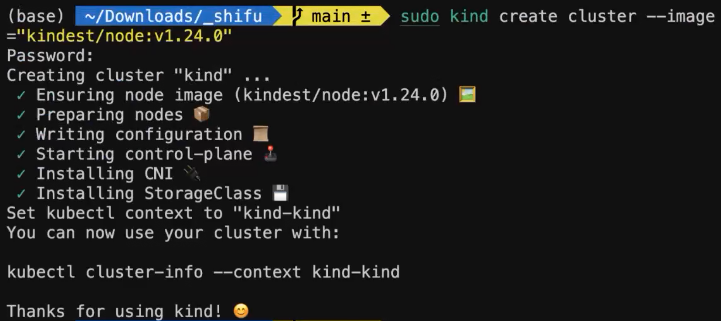
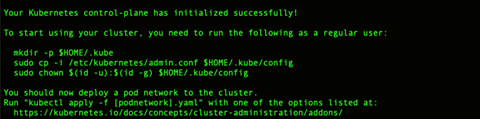
第一步 安装k3s
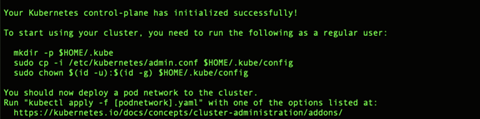
首先我们要在树莓派中运行一个 Kubernetes集群,这里并不限制用户使用的版本,但是为了节省资源本文中使用的是k3s。安装教程
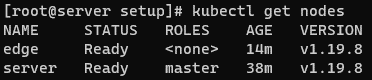
安装完毕后,执行 kubectl version 查看当前 Kubernetes版本:

利用 kubectl get nodes 查看当前集群的状态,显示 Ready 即表示集群可以使用:

至此,k3s安装结束。
第二步 安装Shifu
首先将 Shifu 项目仓库克隆到本地,��项目地址为:
$ git clone https://github.com/Edgenesis/shifu.git
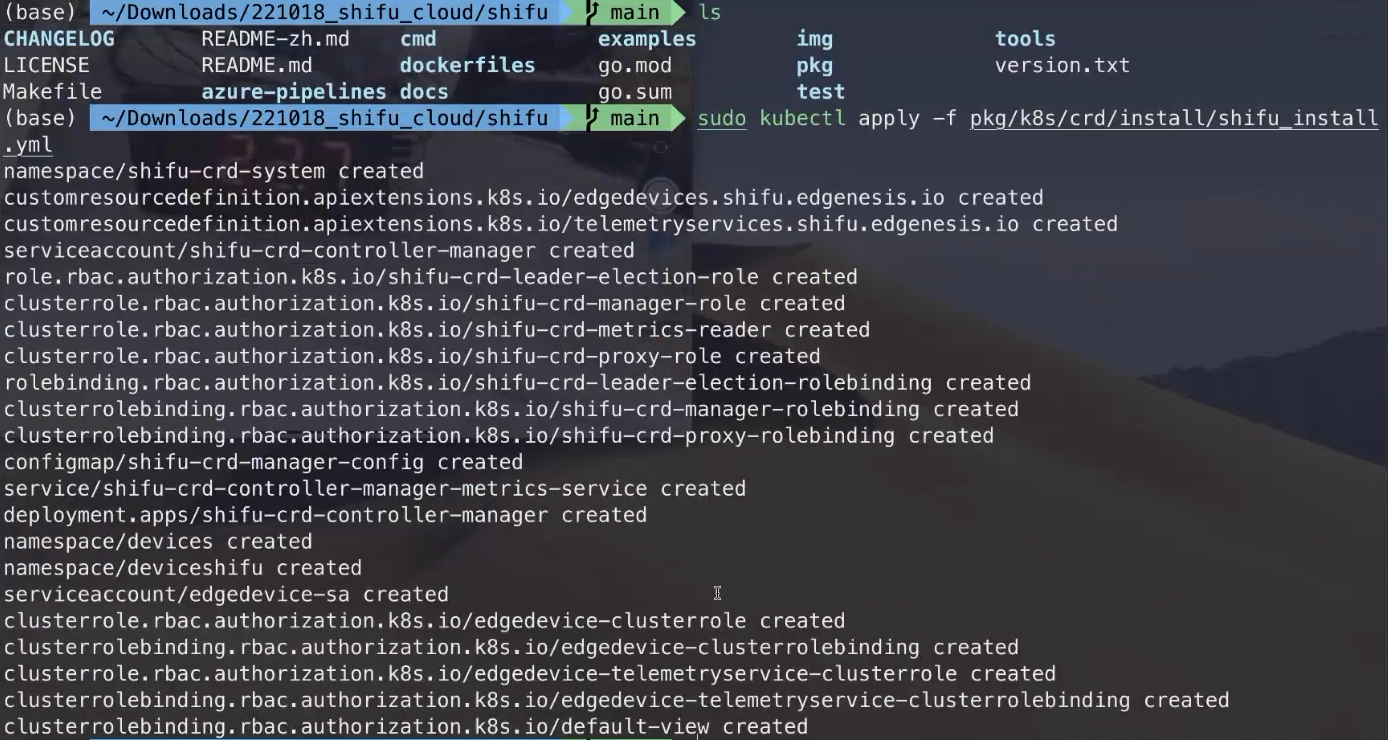
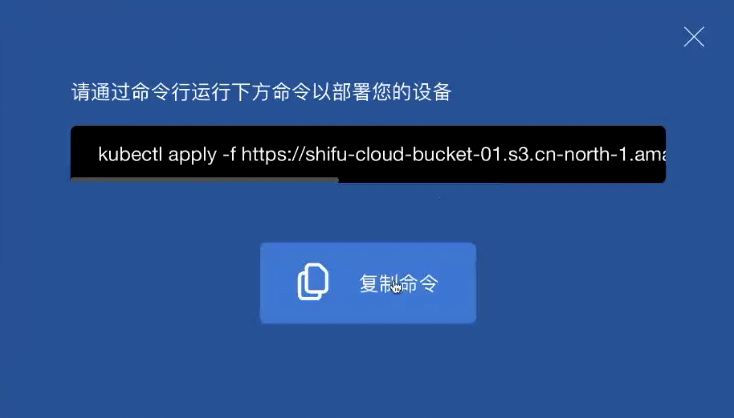
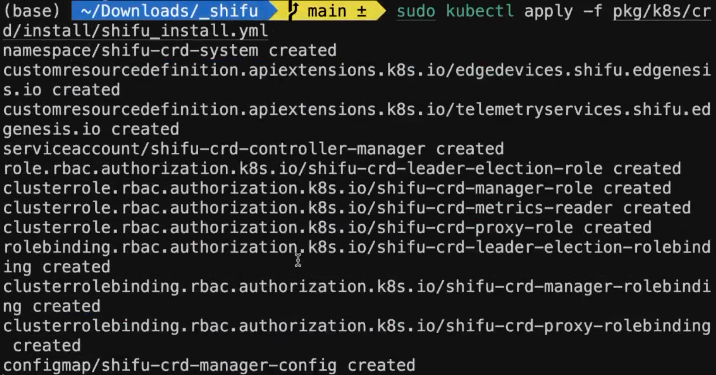
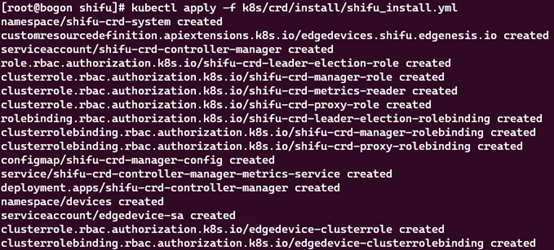
下面通过 kubectl apply -f shifu/pkg/k8s/crd/install/shifu_install.yml 即可一键将 Shifu 部署到 k3s集群中:
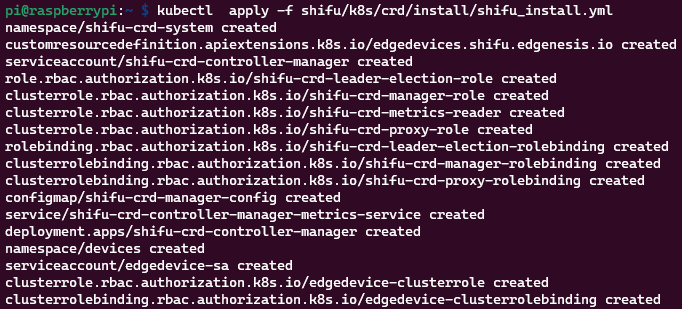
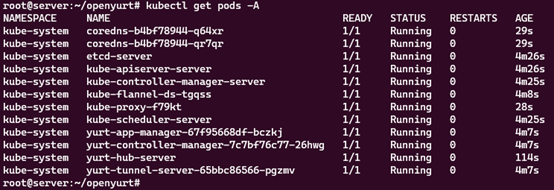
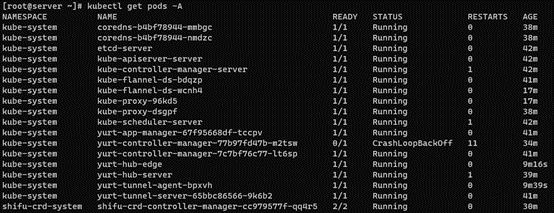
再次执行 kubectl get pods -A,即可看到 Shifu Framework 的控制器被部署到集群中:
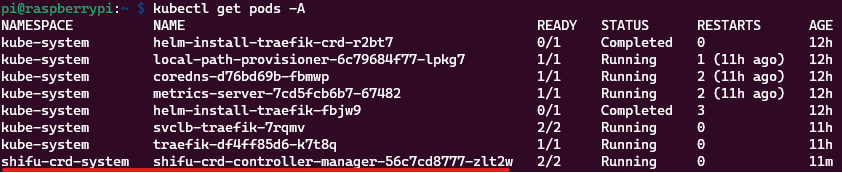
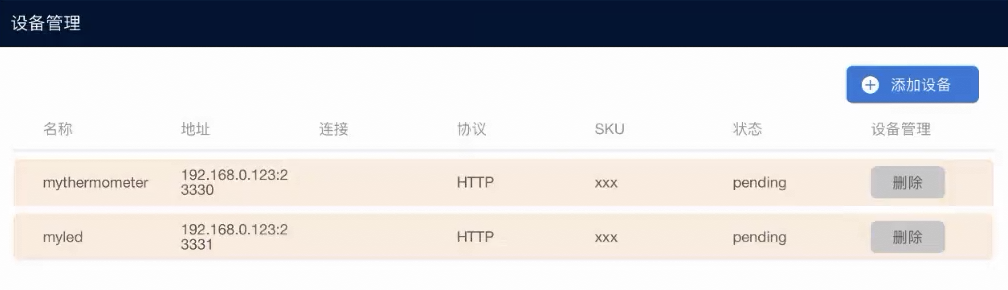
我们也可以通过 edgedevices 这个CRD来管理设备资源(当前没有设备):

至此,Shifu 安装完毕。
第三步 打包驱动
我们需要利用 Shifu 提供的一个小工具来实现可以远程操纵本地驱动,详细的教程请看:
这个小工具实现了将用户/程序发送来的HTTP请求转换到本地命令行来执行。
教程里面提供了一个驱动示例,路径为 https://github.com/Edgenesis/shifu/blob/main/examples/driver_utils/simple-alpine/Dockerfile.sample
内容如下:
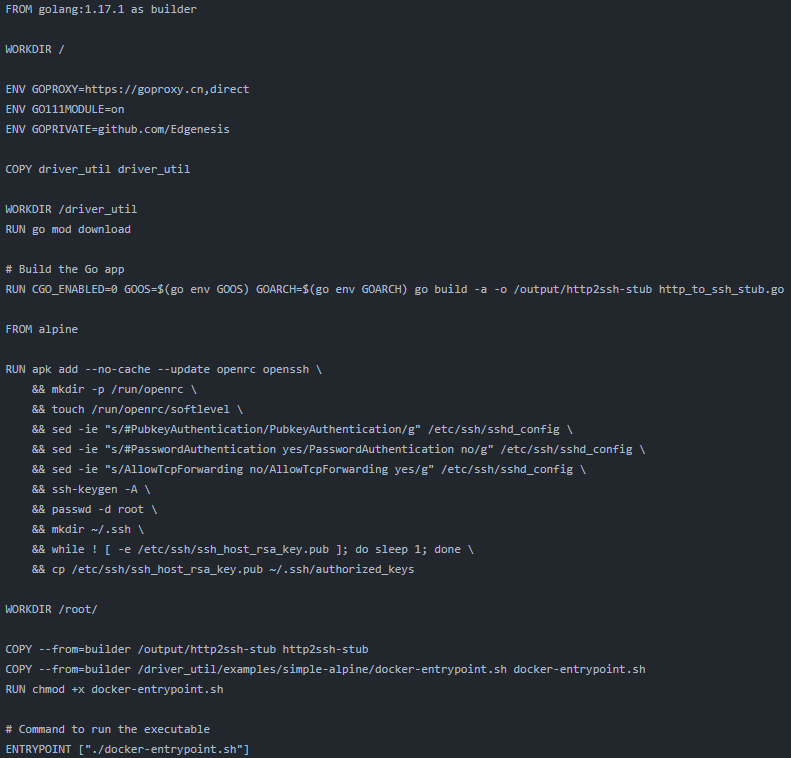
可以看到实例 Dockerfile 分两部分,首先是用 golang 这个镜像来编译 Shifu 提供的 http_to_ssh_stub.go 来实现HTTP到SSH命令行的转换。接着是利用一个空的 alpine 镜像,配置SSH来供演示。
接下来让我们来正式操作。
考虑到树莓派的性能局限,本次编译将从电脑端执行,将编译好的镜像推送到Docker Hub来供远程调用即可。
首先,我们建立一个新的文件夹,这里用的是 dev,然后将创建的树莓派LED驱动保存到该目录:
驱动内容不变
从 Shifu 项目的 driver_util/examples/simple-alpine/ 目录下将 Dockerfile.sample 复制到 dev 目录下:
dev/
├── Dockerfile.sample
└── led_driver.py
更改以下字段将第二部的镜像从 alpine 改为 python:alpine,安装 RPi.GPIO 的 Python 库
最后将 Python驱动 拷贝到运行容器中,新的 Dockerfile 如下,改动的地方已用注释标记出来:
FROM golang:1.17.1 as builder

WORKDIR /

ENV GOPROXY=https://goproxy.cn,direct
ENV GO111MODULE=on
ENV GOPRIVATE=github.com/Edgenesis

COPY driver_util driver_util

WORKDIR /driver_util
RUN go mod download

# Build the Go app
RUN CGO_ENABLED=0 GOOS=$(go env GOOS) GOARCH=$(go env GOARCH) gobuild -a -o /output/http2ssh-stub http_to_ssh_stub.go

FROM python:alpine # modified

RUN apk add --no-cache --update openrc openssh \
    && mkdir -p /run/openrc \
    && touch /run/openrc/softlevel \
    && sed -ie "s/#PubkeyAuthentication/PubkeyAuthentication/g"/etc/ssh/sshd_config \
    && sed -ie "s/#PasswordAuthenticationyes/PasswordAuthentication no/g" /etc/ssh/sshd_config \
    && sed -ie "s/AllowTcpForwardingno/AllowTcpForwarding yes/g" /etc/ssh/sshd_config \
    && echo"PubkeyAcceptedKeyTypes=+ssh-rsa" >>  /etc/ssh/ sshd_config\  # modified
    && ssh-keygen -A \
    && passwd -d root \
    && mkdir ~/.ssh \
    && while ! [ -e/etc/ssh/ssh_host_rsa_key.pub ]; do sleep 1; done \
    && cp /etc/ssh/ssh_host_rsa_key.pub~/.ssh/authorized_keys

RUN apk add --no-cache -Uu --virtual .build-dependencies libffi-devopenssl-dev build-base musl \
    && pip3 install --no-cache --upgrade RPi.GPIO\
    && apk del --purge .build-dependencies \
    && apk add --no-cache --purge curlca-certificates musl \
    && rm -rf /var/cache/apk/* /tmp/*  # modified

WORKDIR /root/

COPY --from=builder /output/http2ssh-stub http2ssh-stub
COPY --from=builder/driver_util/examples/simple-alpine/docker-entrypoint.sh docker-entrypoint.sh
COPY dev/led_driver.py led_driver.py  # modified
RUN chmod +x docker-entrypoint.sh

# Command to run the executable
ENTRYPOINT ["./docker-entrypoint.sh"]
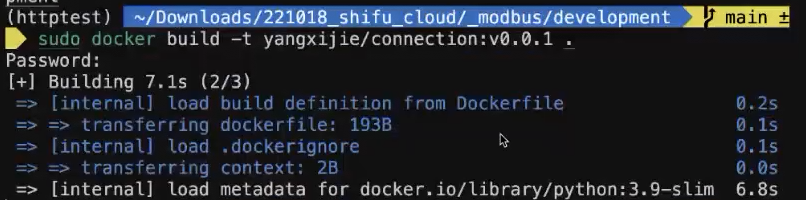
接下来我们来打包封装Docker镜像,因为树莓派的CPU是 ARM64的处理器,本文中编译使用的电脑为 x86-64,所以我们需要使用 Docker 的 buildx 功能来进行镜像构建,有关buildx的教程本文就不再叙述,需要的话可以移步 https://docs.docker.com/buildx/working-with-buildx/
利用 docker buildx build --platform=linux/arm64 -f dev/Dockerfile.sample . -t edgehub/rpi-gpio-driver:v0.0.1 --push 来构建镜像并推送到 Docker Hub 中。
至此,镜像打包部分完成。
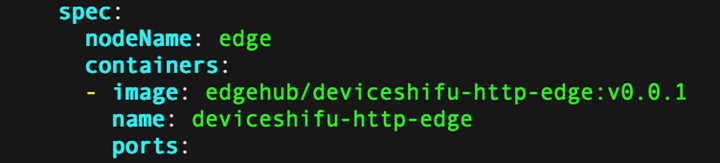
第四步 部署设备孪生到树莓派中
有了镜像以后,我们可以将数字孪生部署到集群中,下面我们来准备部署所需要的文件。
首先是一个 Kuberenetes Deployment YAML 文件,用来运行 deviceShifu 和驱动的 Pod:
deviceshifu-rpi-gpio-deployment.yaml
apiVersion: apps/v1
kind: Deployment
metadata:
  labels:
    app: edgedevice-rpi-gpio-deployment
  name: edgedevice-rpi-gpio-deployment
  namespace: default
spec:
  replicas: 1
  selector:
    matchLabels:
      app: edgedevice-rpi-gpio-deployment
  template:
    metadata:
      labels:
        app: edgedevice-rpi-gpio-deployment
    spec:
      containers:
      - image: edgehub/deviceshifu-http-http:v0.0.1
        name: deviceshifu-http
        ports:
        - containerPort: 8080
        volumeMounts:
        - name: edgedevice-config
          mountPath: "/etc/edgedevice/config"
          readOnly: true
        env:
        - name: EDGEDEVICE_NAME
          value: "edgedevice-rpi-gpio"
        - name: EDGEDEVICE_NAMESPACE
          value: "devices"
      - image: edgehub/rpi-gpio-driver:v0.0.1
        name: driver
        volumeMounts:
        - mountPath: /dev/gpiomem
          name: gpiomem
        securityContext:
          privileged: true
        ports:
        - containerPort: 11112
        env:
        - name: EDGEDEVICE_DRIVER_SSH_KEY_PATH
          value: "/etc/ssh/ssh_host_rsa_key"
        - name: EDGEDEVICE_DRIVER_HTTP_PORT
          value: "11112"
        - name: EDGEDEVICE_DRIVER_EXEC_TIMEOUT_SECOND
          value: "5"
        - name: EDGEDEVICE_DRIVER_SSH_USER
          value: "root"
      volumes:
      - name: edgedevice-config
        configMap:
          name: rpi-gpio-configmap-0.0.1
      - name: gpiomem
        hostPath:
          path: /dev/gpiomem
      serviceAccountName: edgedevice-sa
请注意在Deployment文件中我们为了在容器中使用树莓派的GPIO,需要在容器的 securityContext 中加入 privileged: true 再通过volume的形式将树莓派的 /dev/gpiomem 挂载到容器中。
一个 Kubernetes Service YAML 文件,用来将 deviceShifu 的请求从域名代理到真正的 Pod:
deviceshifu-rpi-gpio-service.yaml
apiVersion: v1
kind: Service
metadata:
  labels:
    app: edgedevice-rpi-gpio-deployment
  name: edgedevice-rpi-gpio
  namespace: default
spec:
  ports:
  - port: 80
    protocol: TCP
    targetPort: 8080
  selector:
    app: edgedevice-rpi-gpio-deployment
  type: LoadBalancer
一个 Kubernetes ConfigMap YAML 文件,用来配置 deviceShifu:
deviceshifu-rpi-gpio-configmap.yaml
apiVersion: v1
kind: ConfigMap
metadata:
name: rpi-gpio-configmap-0.0.1
namespace: default
data:
driverProperties: |
driverSku: RaspberryPiB+
driverImage: edgenesis/rpi-gpio-python:v0.0.1
driverExecution: "python led_driver.py"
instructions: |
pin:
operate:
help:
telemetries: |
device_health:
properties:
instruction: help
initialDelayMs: 1000
intervalMs: 1000
在 ConfigMap 中我们需要配置驱动的执行路径,因为在生成镜像时我们将Python文件直接放到了默认路径下,在这里填写 python led_driver.py 即可。如果驱动是一个二进制文件的话这里直接填写二进制的目录即可。
一个 Shifu EdgeDevice YAML 文件,用来生成设备孪生:
edgedevice-rpi-gpio-edgedevice.yaml
apiVersion: shifu.edgenesis.io/v1alpha1
kind: EdgeDevice
metadata:
  name: edgedevice-rpi-gpio
  namespace: devices
spec:
  sku: "RaspberryPi 3B+"
  connection: Ethernet
  address: 0.0.0.0:11112
  protocol: HTTPCommandline
将这四个文件放到树莓派中,目录内容如下:
led-deploy/
├──deviceshifu-rpi-gpio-configmap.yaml
├──deviceshifu-rpi-gpio-deployment.yaml
├──deviceshifu-rpi-gpio-service.yaml
└──edgedevice-rpi-gpio-edgedevice.yaml
利用 kubectl apply -f <dir> 即可将 deviceShifu 部署到 k3s 集群中:

接着通过 kubectl get pods 来查看运行状态:

通过 kubectl get edgedevices -n devices 来查看集群中的所有设备孪生:

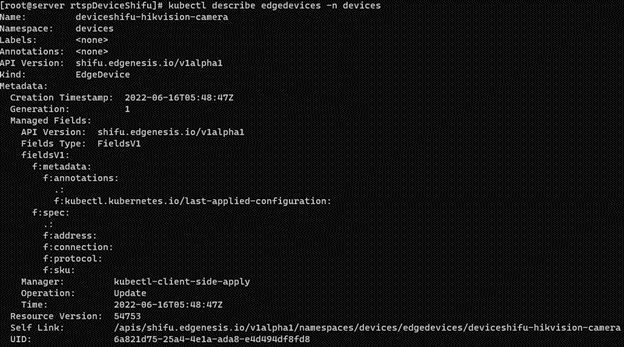
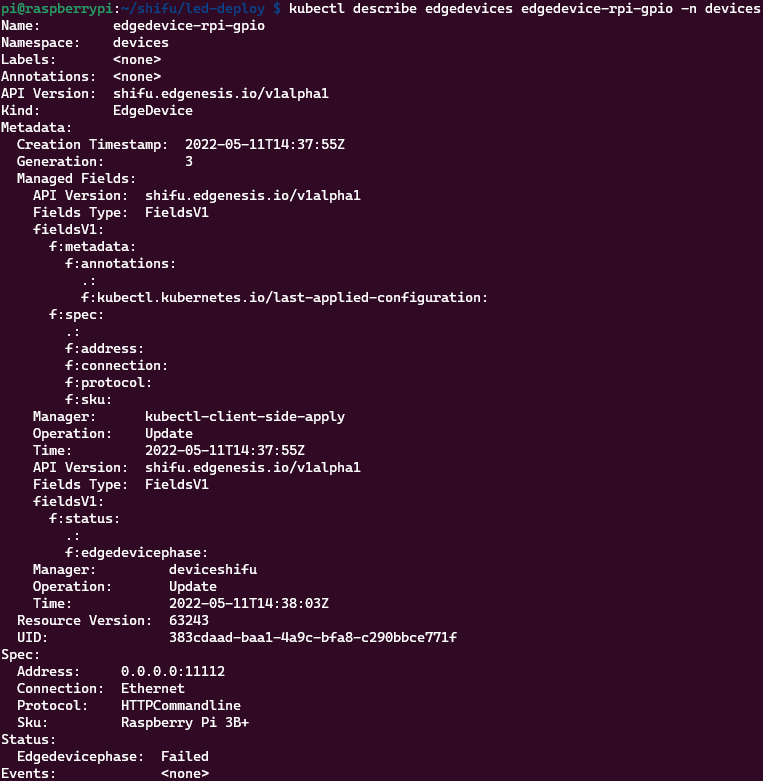
再通过 describe,即可查看数字孪生的详细信息:
接下来我们就可以和设备互动了,在这里我们部署一个 nginx 容器来代表实际场景中的应用
部署命令为 kubectl run nginx --image=nginx
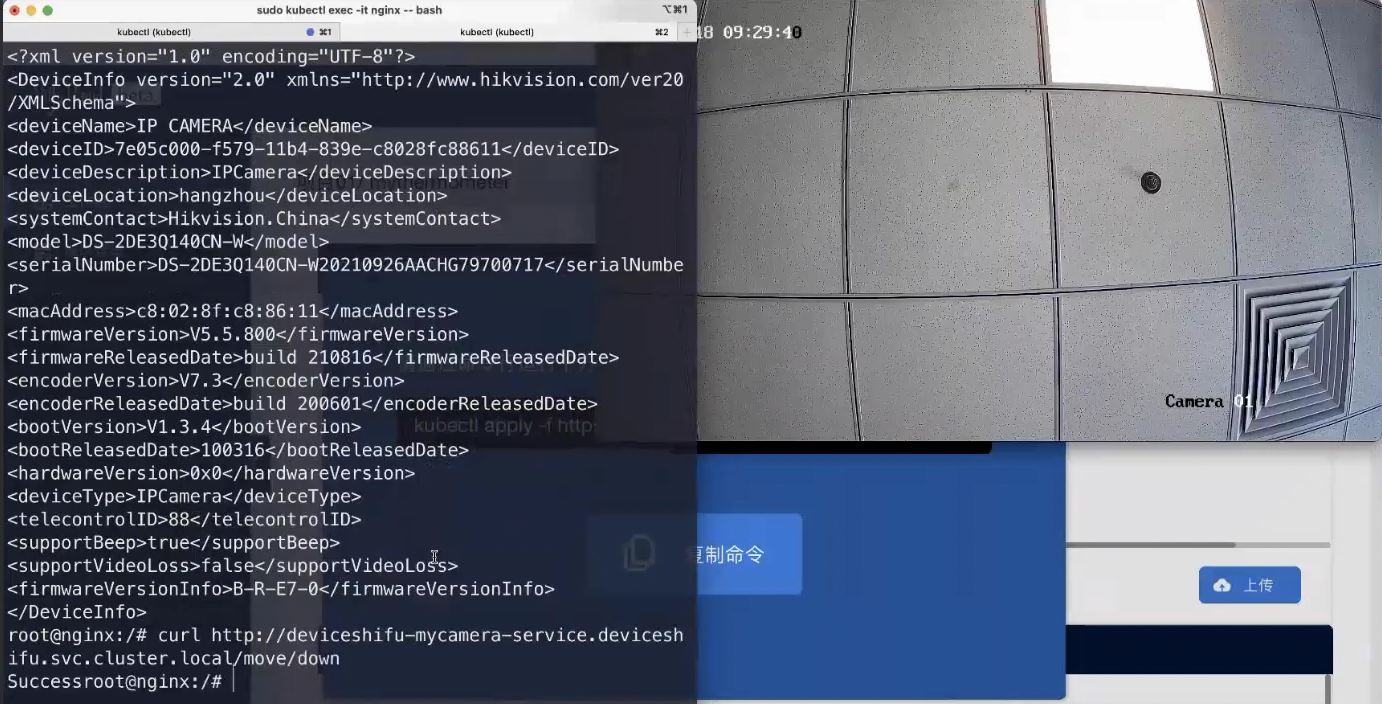
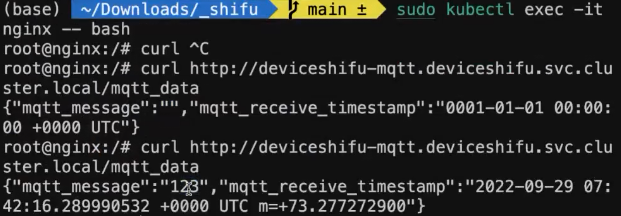
接着执行 kubectl exec -it nginx -- bash 进入 nginx 的命令行:

最后,利用 curl 来给设备发送命令,驱动接受的命令格式为: python led_driver --pin <x> --operate <on/off>
利用 Shifu 来发送命令的话将由HTTP转换到命令行,请求地址写法为: http://edgedevice-rpi-gpio/pin?flags_no_parameter=<pin>,--operate,<on/off>
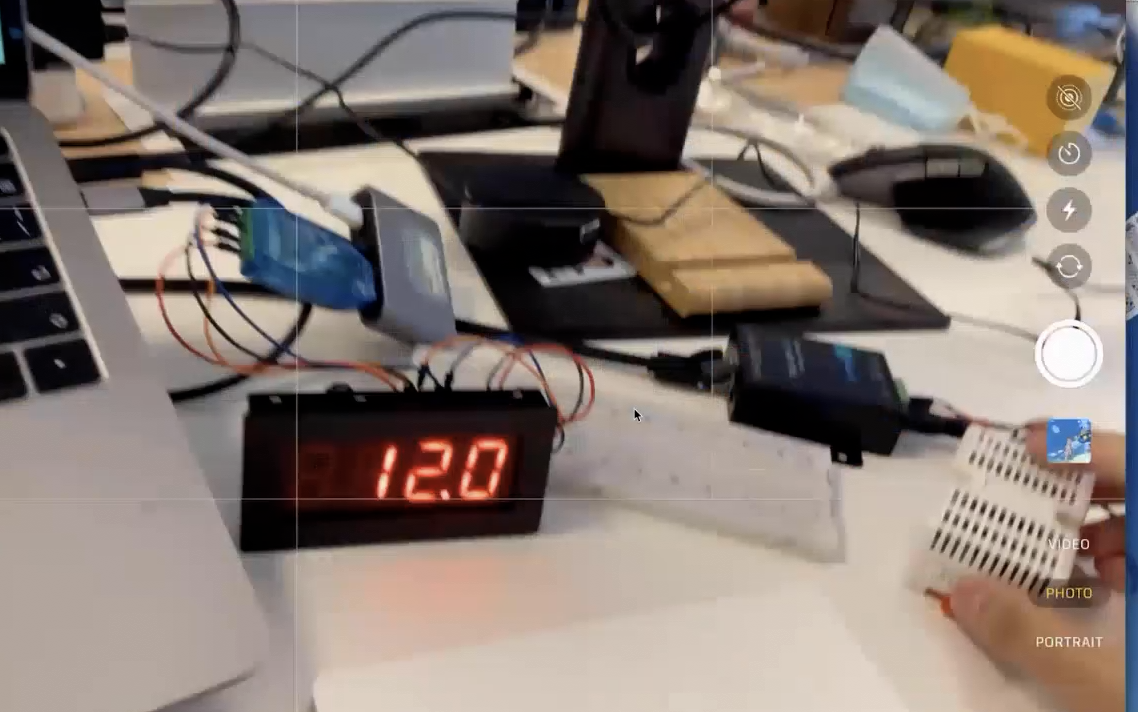
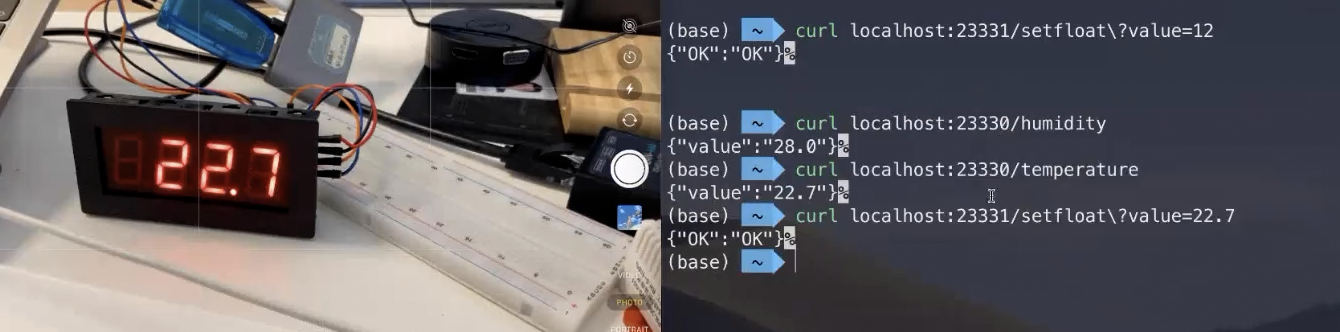
运行效果
程序通过直接给设备的域名发送HTTP请求,即可操控LED灯泡的亮/灭:
至此,将树莓派驱动接入 Shifu 完成